Pages

Sunday, 11 December 2011

Wayzgoose Christmas Show 2011


I’ve just finished my last show of the year! Wayzgoose is an annual Christmas show held in a local art complex called Jubilee Stores based in Newport on the Isle of Wight. Every Christmas the artists-in-residence open their studios for a special two-day event. They invite about 20 artists to exhibit with them, which means there’s a wide range of different art and craft disciplines on show for people to choose from and enjoy.

This is the second year I’ve exhibited in the show (you can read last year’s post here). At first I was worried I might not have enough stock to put on my table. This is a common complaint among artist/makers in general it seems! However, luckily the kiln had been fired and was ready to open on the day of setting-up: so I had some lovely new vases to put out on my stand. In fact, they were so brand new they were still toasty and warm…

Unlike last year (when I forgot my camera) this year I remembered to take some photos. Here are just a few of them. I wanted to show off my new vases properly with a flower display, and had the idea of using a bunch of red tulips. I didn’t think I’d get tulips at this time of year, let alone red ones! But luckily my local florist had them in stock. They were perfect really because they had a red-and-green Christmas theme, but at the same time felt very fresh and cheerful. I think it must have worked because my vases did very well at the show! So overall it was an excellent weekend and a really positive way to end the year.

Saturday, 3 December 2011

Christmas Open Studios


This weekend I’ve been out and about visiting a couple of Open Studio events on the island. I thought it would do me good (between my own shows) to visit other people’s. So last night I went to see my friend Sue Paraskeva’s studio in Ryde. Sue is a potter who specialises in hand-thrown porcelain tableware and one-off altered pieces. She uses a stick-driven momentum wheel for throwing, and ‘reduction’ fires all her work using a gas kiln. Last night her studio was overflowing with beautiful pots on display all around the walls and shelves.


Her work is mostly monochromatic: pure whites, lightly toned greys with the occasional pale green celadon or splash of dark oxide. This calming, harmonious colour scheme means her pots complement each other, mix and match perfectly, and look stunning together as a display. For a festive atmosphere Sue provided visitors with plenty of wine and mince pies (which I ate from one of her lovely side plates) and arranged a trail of pretty candles to guide guests along the path to the front door of her studio – a welcome glow on an otherwise cold wintery evening!


Earlier today I went on my second Open Studio visit to see my friend Anna Hayward who lives just outside of Cowes. I met Anna a few years ago on a raku workshop, but besides making ceramics, Anna specialises in making handmade glass beads and jewellery. I’m rather envious of her studio which is a lovely wooden summer house/shed in her garden. Knowing nothing about the process myself, it was fascinating to watch Anna demonstrate lampworking – which is the method she uses to make her beads – and to learn about her tools and equipment. It was very interesting too to talk about the crossover between glass bead making and ceramics – glazes being essentially made of glass of course and both disciplines using fire, minerals and kilns in their processes.


There’s also a crossover between Anna’s styles of work. Her interest in circles and spirals feeds into her designs and methods of working in both her ceramics (which are mostly hand-built coiled pots) and her beads, which feature colourful dots, snake-like lines and swirling patterns. In fact she also uses her pots to display her work, setting off her jewellery beautifully. So I had a very enjoyable afternoon admiring her skill - and choosing a couple of pieces to take home with me too!

Anyway, thanks Sue and Anna for their lovely shows!

Saturday, 26 November 2011

Mid-show Inspiration


As you might know from my last post, I'm currently in the middle of a week-long Christmas show that runs until next Tuesday. Usually I blog before a show to let people know where they can find me, and sometimes afterwards too, just to give an update on how it all went. But this time I thought I'd blog mid-show instead! Because the thing about doing exhibitions and shows, is that between all the packing-of-boxes and setting up and travelling and so on, somehow there's still moments to get inspired and have new ideas.

Above is a composite of some photos I've been taking around the Quarr Abbey grounds - the venue for my current show. It's such a nice venue because whenever I need a break from standing and talking I can get a breath of fresh air for a couple of minutes by taking a quick walk in their lovely gardens. These photos show a few inspiring textures and colours to be found around the grounds including some lovely clean white birch bark pointed out to me by fellow exhibitor Gill. Already these have given me some ideas for making marks in clay - which I'm keen to have a go at. It's frustrating though because I'm going to have to wait a while before I'm free again to start making! Hopefully these photos will remind me of these ideas for when the shows are over.

In the meantime though, here's a photo of my stand for this year's show.


Saturday, 12 November 2011

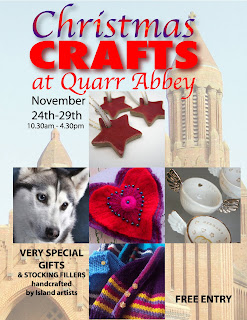
Christmas Crafts – Forthcoming Show


Yes, it’s that time again! Just thought I’d do a quick plug for my forthcoming Christmas show at Quarr Abbey. This will be the third show I’ve had at Quarr: the first was last November and I also had my Open Studio event there this summer too. So it’s become quite a familiar venue! It’s a lovely day out for visitors with plenty to see, and since last November they’ve opened a bigger cafĂ© with a farm shop that sells local produce: so plenty of coffee, cakes and food to enjoy! As usual they’ll be five of us exhibiting together in the Exhibition Room showing a selection of different crafts, including pottery, felting, hand-knitting, hand-weaving and this time a local photographer will also be joining our group. So if you’re in the area, please do pop in!

Christmas Crafts at Quarr Abbey

24th – 29th November 2011

10.30am – 4.30pm

Free Entry


Thursday, 3 November 2011

How to Reclaim Clay

In the process of making pots – especially when throwing - there’s a lot of leftover clay and ‘slop’. Luckily clay is extremely easy to recycle and use again. As long as the clay hasn’t been fired you can keep using it over and over, and this process of recycling clay is called ‘reclaiming’.

In my studio I don’t have a dedicated sink, so all my slops go into buckets. I make sure only ‘clean’ slop goes in (no nasty bits of sponge or dirt) and they soon fill up! The clay settles just like mud in a pond and every-so-often I scoop out the clear water that sits on top. Most books advise waiting to let clay dry out completely - until bone dry - before breaking up, soaking again and then reclaiming. However, I find reclaiming direct from slop works perfectly well for the small quantities I use and the purposes I use reclaim for (as will be explained!). So when I’m ready to start reclaiming, I pour off as much water as possible until I’ve got a bucket of sludge clay.


This is the messy part! I usually use spoons rather than my hands to ladle out the sludge - which can be a mixture of thick and runny clay. If the clay has been standing for a while, this can be pretty smelly sometimes too – a bit like a river at low tide! I scoop out the sludge and lay it onto plaster blocks. I have two flat plaster blocks about 2cm thick, which I use for reclaim. Plaster absorbs moisture and helps speed up the drying process. Of course I don’t want the clay to dry out too much, so once I’ve ladled out what I need, I keep an eye on it throughout the day. In the summer the clay can dry in a matter of hours; in the winter it can take several days.


I can tell if the clay has dried out enough by testing the edge – it should start to lift off the plaster in one big lump. I like my clay to be a bit on the soft side though when I reclaim – still a bit sticky – so it's less likely to dry out too much accidentally while in storage. When the clay is ready, I tip it onto a wedging board. I use wood to wedge on, and since wood absorbs moisture, this takes out the last bits of stickiness in the clay.


I don’t have a pugmill so the next step for me is to wedge the clay in the usual way using a wire. This eliminates any air from the reclaimed clay and evens out the consistency. Finally I shape the clay into small blocks or balls and bag them inside plastic bags. I usually spray water into the bags first and then really wrap the plastic closely around the clay to minimise the air left inside. Then I keep my reclaim in a damp plastic tub with a lid and store it in a cool, low corner of the studio.


It’s best to let reclaim mature for at least six months before using it again, especially for throwing. The experts say this is all to do with the molecular structure – in fact the older the clay the better apparently. It can be useful therefore to date reclaim at the time of making to keep track of how old it is. Having such a small studio space though means I can’t really store too much clay while I wait for it to mature. So I use reclaim almost straight away for throwing bats and for supporting pots during turning. This works out really well for me because it means I don’t waste ‘brand new’ clay on a bat for instance – clay that would otherwise go straight back into the slop bucket at the end of the day!

Anyway, that’s how I reclaim clay!


Saturday, 22 October 2011

French Linen and Lavender Bowls


You can’t beat French linen for a touch of natural chic – or at least that’s what I think! This is my very first piece of vintage French linen…which implies I wouldn’t mind having some more. This large tea towel with red stripe was only £7, which I thought was an absolute bargain­, so I had to have it. It’s going to be perfect for my display stand at shows – I’ve got a Christmas show coming up in November at Quarr Abbey on the island (which I’m sure to blog about soon). I think this linen with its simple red stripe will give a nice understated seasonal look to my display: something that’s in keeping with the Christmas mood but doesn’t detract from the pots. Hopefully it will enhance them!


Of course it’s going to be useful for styling pots in photographs too. And I’ve already been using my new piece of linen in a set of photographs you can see above. They feature a small cylinder pot I threw back in August (blogged here). You might remember I had a ‘plan’ for these pots. Well the plan hasn’t quite happened yet (no fault of the pots!) and I still don’t want to give the game away; so it will have to wait! In the meantime I’ve called these pots ‘lavender bowls’ to give people an idea of how they could use them. As always, a bowl has a thousand different uses, and the plain white glaze I’ve decorated them with is food safe – so they can be kept in the kitchen for serving dips and sauces etc. But after sorting through a crop of lavender gathered from my garden and popping a handful into one of these pots, I could see straight away how pretty and fresh they looked. So that's what they're called for now!

Click on the pic below and you can see them listed in my shop...

Friday, 14 October 2011

Turning Bowls: Foot Rings vs Flat Bases.


For a while now I’ve been making a style of bowl that didn’t require a foot ring. Hopefully you can tell in the pictures above that my sugar bowls, drizzle bowls and salt-and-pepper bowls are all turned completely flat at the base. Because of their shallow shape, these bowls already have a low centre of gravity and don’t need the stability of a foot ring, so I chose a flat base to complement this style and give them clean, simple lines. Flat bases also have advantages in the making process since they’re much quicker to turn and less wasteful of clay.


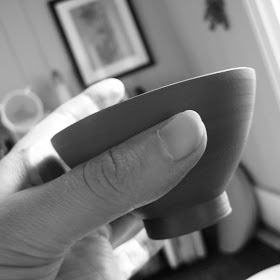
Sometimes though a style of pot just cries out for a nice bit of fancy footwear! So in a recent commission of bowls I’ve chosen a traditional-style deep foot ring to go with the deeper shape of the bowl. The photo above shows a pot turned upside down on the wheel ready for turning a foot ring.


In the photo above you can see the same bowls freshly turned with foot rings. I always leave turned pots to dry upside down: this airs the bases so the whole pot can dry out more evenly which helps minimise the risk of cracks appearing.


In the photo above you can see a smaller bowl. This was made with a bit of ‘left over’ clay at the end of the throwing session. I made this bowl with a steeper angle so when I came to turn it I decided to make a very narrow deep foot ring. I think it makes a very pretty silhouette – so I might make a small batch of these. In the last photo below you can see my pottery seal: just to prove I made them!


Wednesday, 5 October 2011

Making Space in the Studio

Lately I’ve been bemoaning my lack of studio space. (Not for the first time!) I know I’m lucky to have a dedicated area to work in, but recently I’ve been feeling like most of my time in the studio is taken up with careful ‘jigsaw puzzling’ of things around me.

Back in February this year (when I got my new shimpo wheel) I took a photo of my pottery studio (blogged here). Looking back it seems very sparse and tidy! But during all this time it felt very ‘temporary’ too. Lack of table space is my biggest concern, especially when throwing – there’s no room for fresh pots! And for some reason I’ve been putting up with this arrangement ever since. Finally last week I decided to do something about it.

So I bought a set of wooden shelves. Yes, it was that simple! Any normal person would have put some up straight away. But the fact that the tongue and groove on the walls can’t take any weight waylaid me. Instead I found a set of freestanding, second-hand shelves in an antiques place for £10. They’re perfect for stacking all my tools and filing away pottery notes – stuff I don’t want cluttering the surfaces. And it’s amazing how even a small change like this can make a huge difference.


The next stage in expanding my work surface was to commandeer an old sewing-machine table we had upstairs. This is much better than my wibbly-wobbly folding table! Then for an extra bit of flexible space I’ve also re-appropriated an old piece of wood. This is about the same size as one of the tabletops, and it can be laid out on top of the wibbly-wobbly trestle table to instantly double the surface area when needed (and folded away again when not).

Adding just these few bits of furniture has transformed the space. It feels more permanent and actually bigger too – even though there’s more stuff in it! And psychologically it’s already made a difference to how I work. Instead of constantly wondering where to put something (which can be tricky if your hands are covered in clay) I can focus on the natural flow of making pots.

So overall a very successful £10 spent. I really should have done it sooner…

Friday, 23 September 2011

Decorating Pots: Brushwork Practise


Recently I’ve been experimenting and practising my brushwork for use on my ceramics. Anyone looking at my pottery might notice that I don’t really use much decoration; I mostly use one or two simple ‘all-over’ glazes on a pot and that’s it. Even my raku pieces are made in this way. But I’ve been thinking about developing some additional decoration on my pots using combinations of slips and/or oxides. Of course there are lots of ways of applying oxides (they can be dripped on or sponged on for instance) but brushwork is one area I want to explore.


I mentioned in a previous post that I’d bought some new brushes (click here). I’ve been using these to create large, flat marks on some of my pots. The photo above is an example of this on a new vase. This pot has been hand-thrown in stoneware clay and brushed with a white slip beneath a clear glaze. Then iron oxide was brushed on using the smallest of the wide brushes and allowed to drip naturally. The pot was then reduction fired in a gas kiln. As you can see, the iron oxide has created a beautiful deep metallic red/brown mark. (This pot is for sale in my Folksy Shop!)


I also have some Chinese-style potter’s brushes made in bamboo – which you can see above. These are perfect for decorating with oxides or slips. This style of brushwork is something new to me however, so instead of wasting any expensive oxides or fired pots I thought I’d do some practise first! So I used some watered-down acrylic paint on absorbent handmade paper to try out some shapes. Of course paint on paper doesn’t flow in quite the same way as oxides on clay: for one thing oxides absorb instantly onto glazes and the flow of the brush is different too. But it really helped to experiment and get an idea of the shapes and marks that are possible. I also practised some brush marks onto the side of a finished vase – just to get the hang of decorating around a three-dimensional shape.

Overall it was fun to do and a really interesting exercise. You can always learn so much more from doing instead of just looking at pictures! At the moment though it’s still too early to tell whether this is something I will fully pursue or not in my own work. It may end up being something I tried a few times, but wasn’t for me: who knows!

Wednesday, 7 September 2011

Landscape Painting: Suffolk

Back in February this year I took a trip to Suffolk to visit family. I was brought up in Suffolk so it’s a landscape I’m very familiar with. During my visit I spent some time walking in the countryside taking photographs to use as future reference and inspiration for painting. I decided I’d better use some of this material before winter comes around again! So in the last few days I’ve been working on a new painting inspired by the winter scenery in Suffolk.

I’ve chosen a square format again for this landscape painting and as usual I’m using acrylics on canvas. As you can see from the pictures above I don’t do much preparation. I’ve never really been one for making lots of sketches and plans – I tend to visualize a scene in my head and then go straight to canvas. All I did for this painting was make a very simple sketch in a small notebook to outline the basic composition. This I referred to while I was working to remind me of the plan in my head.

For the colour scheme I chose a limited palette. I’ve also written down which tubes I’ve used to keep a record for future reference. This winter palette is a mix of smoky blue/greys for the distant trees and the road in the foreground, with a very pale washed-out sky. I’ve also chosen a deep purple/brown to imitate the colours found in neatly cropped hedgerows – a feature so typical of modern Suffolk farmland. In contrast I’ve used a vivid, luminous green to highlight the field. I’m hoping this suggests the early growth of a crop and how electric the colour can seem in the midst of winter. A tiny part of me feels I’ve exaggerated this colour just a smidge – but I quite like that!

Anyway, here’s a photo of the finished painting. My experience of looking at it reminds me instantly of the fields and farmland ‘back home’ – this particular field is just 200 yards from my old house! So I’m pleased with the result. The canvas is quite small so I’m thinking I might continue this theme based on Suffolk landscapes on a larger scale: to give myself more room to express those huge open spaces.

Saturday, 27 August 2011

Throwing - Shallow Cylinders


I’ve been trying out some new ideas in the past week or so. I started off throwing a series of low, shallow pots which you can see drying in the picture below. I suppose they’re low cylinders really: a very simple design thrown straight across at the base and then straight up at the sides. These are quite small, made in stoneware using about 175g of clay. I have a plan for these which I won’t reveal at the moment because I want to see how they turn out first! But it’s part of a new series of functional ware I want to experiment with over the next few months.

As I was throwing them I had an idea I’d take some photos of me throwing ‘in action’. The composite picture at the top of this post is the result. You can see how small the balls of clay were. And it’s not easy taking a photo using a timer whilst trying to concentrate! Luckily the camera only got a little bit smudged with clay – I was more worried about knocking it into the drip tray! And luckily I think the photos came out OK too. I tried to show in sequence the ‘opening out’ phase of throwing a pot which widens the base (the stage that comes after putting the hole in the centre of the clay). But it all depended on when the timer went off! I’m not even sure if that pot survived now – I might have been too distracted by photos…


Tuesday, 16 August 2011

Leach: A Book and a Pot


It’s always worth having a look on Ebay in case there’s a bargain to be had. A couple of weeks ago I was browsing in their books department when I found a copy of Bernard Leach’s A Potter’s Book. I knew this was a classic in terms of ceramics: a title on the list of ‘books-to-read-one-day’. So I decided I might as well make a bid (especially since it was only six quid) and a couple of hours later an email told me I’d won!

I’m really chuffed with my copy. It’s a 1965 hardback edition with dust jacket, in good condition and complete with a musty old book smell that all the best books should have. It’s a really nice size too - so many pottery books are huge, heavy things with sharp corners, which make them uncomfortable and exhausting to read. I’ve only just started to read this one however (a couple of pages in) but flicking through I can tell there’s plenty of information and ideas to absorb. I’m particularly interested in the chapter on Decoration because this is an area I want to develop in my own work. And since Leach was such a master of brushwork, I’m hoping I can gain some ideas and technical tips. (If you don’t know who Leach was by the way, here’s a wiki bio.)


On the subject of Leach, I thought I’d also mention a St Ives Pottery piece IC bought back in May this year. We found it in the same local second-hand warehouse place I bought my little rush pottery stool from (blogged here). IC spotted the pot first and called dibs before I could get a chance! Straight away I knew it was a ‘proper pot’ because I’d seen one exactly like it in the V&A in their Ceramics Gallery. But we didn’t realise until we got it home and checked the seal that it’s a St Ives piece. After some research we established it to be a standard ware coffee pot, possibly 1950’s/60’s. It has a lovely green glaze that breaks away at the rim and which I think might be a type of wood ash. And although it’s a lovely pot and we only paid £12 for it, (well, IC paid £12…) it does have a hairline crack running down the side – which I only noticed when we got it home. We were really disappointed by this (!) mainly because it means we can’t use it: and pots like this are even better if they're used…


Anyway, I’m really pleased to have an example of St Ives Pottery in the house because you can learn so much from handling them: weight, dimensions, detail – even following the throwing rings with your hands helps an understanding. In the blurred photo below (which I took at the V&A during my last visit blogged here) you can see the same style pot packed in with other St Ives pieces. Much as I love the V&A, all their lovely pots are - in some ways - inaccessible; locked behind glass unused and unhandled. If only they’d let me have a few of them to take home!


Monday, 1 August 2011

Open Studios: after the show...


I’ve just had a very successful Open Studios held in the Art Gallery at Quarr Abbey near Binstead on the Isle of Wight. It was a really good week: luckily the weather wasn’t too extreme in either direction, which meant the Abbey attracted lots of people. Over the six days we counted 1001 people through the door! We were so pleased with the response: and luckily some of them were happy to spend their money too!

I shared the venue with four other artist/craft makers including my sister Sue. Last year my sister and I shared a stand at Freshwater Parish Hall as Osmosis (blogged here). But this year we wanted to showcase our work separately: so I had my ceramics and paintings on display, and my sister had her knitting, weaving and spinning wheel on show for demonstrating.

The Abbey is a lovely place to visit - which I think I mentioned before when I blogged about our November show last year (here). What I really like about the Abbey as a venue is how the simple, rustic style of the buildings and grounds seem to suit my own style of ceramics. I think having a venue that sets the right tone really helps people appreciate the work better. But I was also pleased with how my display stand went this year too.

This year (unlike last year's Open Studios) I was able to show my paintings too. In fact this was possibly my first show where all the elements of my stand could be displayed as planned! I’ve been to many shows where (on the day) the stand isn’t quite what I thought it was going to be (sometimes nothing like!) and I’ve had to improvise a display or sacrifice pieces of work. This is always frustrating – but amazingly it all fitted this time! I had a big wall space to hang my paintings from and below these I had three tables in a line to show my ceramics. I even had space to show some mixed media originals from my portfolio, which is something I’ve wanted to do for ages…


In the end we all had a very good Open Studios – and most of us will be back at Quarr Abbey again in November for a Christmas Crafts show. In the meantime though I still haven’t unpacked everything, so there are boxes everywhere!

Monday, 18 July 2011

Open Studios: 2011


I thought I’d just do a quick blog today to mention that I’ll be taking part in the Isle of Wight Open Studio event coming up this weekend. This time my Open Studio is being held at Quarr Abbey and will be running for six whole days: so I’m preparing for a busy week! There are five of us sharing the venue at Quarr in the gallery/exhibition space, so there should be plenty to see including ceramics, paintings, felting, knitting, jewellery and more. There are lots of other artists exhibiting over the whole weekend across the north, central and east of the island – so if you’re thinking of popping over for a visit there’s plenty of other venues to see too. You can download a brochure for the Open Studio weekend here and you can see the details of my Open Studio event here. Hope to see you there!