Pages

Thursday, 20 December 2012

Lists and End of Year Review...

At the beginning of 2012 I made a list of things I wanted to do. These included new designs I wanted to make and equipment I wanted to add to the studio. And for once I’ve actually managed to cross off all the items on the list! This is unheard of: usually at the end of the year I have to transfer half the items from the unfinished ‘to do’ list over onto the following year. So 2012 has been a very productive year for me!

Two major items on the list this year were a) fix the studio roof and b) install a kiln. Both took much longer than expected and proved very disruptive: but ultimately worth it in the end. My studio has been transformed and it’s made such a difference to how I work. As for the kiln: well I’ve only just squeezed that into the last closing minutes of the year. It was finally plugged into the electrics last week and switched on. As far as I know it’s ready to go (all the lights are working and nothing exploded thankfully) but I still need to do a ‘first firing’…

Of course once you cross off one thing on the list, new things spring up in its place. So here’s my current mini sub-list for the last few remaining days of the year:

1)   Read the manual for the kiln controller (not as easy as it sounds).
2)   Program the controller for a ‘first firing’ (still not as easy as it sounds).
3)   Load the kiln with furniture only (ie; shelves and supports, no ware) leaving bungs out to ‘first fire’ the kiln. (This is done to oxidise the brand new kiln interior and also to dry out the batts.)
4)   Cross fingers and hope it all works…
5)   Shout yippee if it does and apply batt wash to kiln shelves.
6)   In the meantime continue making pots ready for a first bisque firing (planned for sometime in January).
7)   Oh yes, and have Christmas day in there somewhere!

I’ve already started my new list for 2013. Next year I’m looking forward to getting to grips with firing my new kiln and developing my own range of glazes. And of course I’d like to make some new designs again too. No rest for the wicked.

Happy Holidays!


Friday, 30 November 2012

Special Delivery Again

It’s been a busy month – and it’s not over yet! I’ve been up to my ears in Christmas shows. In fact my next show starts later tonight at 6pm. I’ve got everything packed ready and soon I’ll have to leave to set up my stand. But since I’ve got a few minutes to spare before I go, I thought I’d quickly blog about my extra special news…

As you can see in the photo above, I’ve had a lovely new kiln delivered! It actually arrived weeks ago – at the beginning of November – but I’ve had so much to organise with all the shows I’ve been doing I haven’t had any time to blog it or even unwrap it properly. I’ve been walking past it in the studio carrying boxes of pots backwards and forwards, but I haven’t had any time to play around with it. Most frustrating!

It’s a toploading electric kiln, single phase, 40 amp and as you can see from the photo, bright green! It still needs to be wired directly into the plug, which means I have to wait a bit longer… And it’s actually bigger than I expected. When it was being unloaded off the back of the lorry there was a moment when I thought it wasn’t going to fit through the front door. And when we got it off the pallet and to the bottom of the front steps, then it really became obvious it wasn’t going to fit through the front door. Not only was it impossibly heavy for two people to lift (there was nothing to hold onto and frankly the steps defeated us) but also, despite all my careful measurements, I hadn’t accounted for the door handle…there’s a lesson there.


However, we managed eventually to wheel it into the studio via a long circumambulatory route (luckily it was already fitted with casters) and we even had daylight to spare! We pushed it into the corner of the studio and went into town to celebrate with a couple of well-deserved lattes. And since then my poor new kiln has been sitting waiting exactly where we left it.

Anyway, I have to go now to set up a show! Hopefully next month the kiln will be plugged in and ready to go.

Friday, 2 November 2012

Winter Plates - Display

Yet again I’ve got building work going on today (!) and since I can’t make any pots I thought I’d do a quick blog update. I’ve been meaning to blog this for ages in fact, but got distracted. Back in August (in the middle of summer!) I was making a couple of side plates on the theme of ‘Winter’. You might remember the post. This was for a promotional photo idea for an Etsy team which I’m a member of, called the UK Clay Users or UCU for short. The idea was to design and make plates that could be arranged as a wintery themed wall display.

As you can see in the photo above the collection of plates look really good together – we all seemed to colour coordinate! And the winter theme really does show through in the display. The photo and the idea itself is all thanks to Jude Winnal of VanillaKiln on Etsy – a big thanks Jude for all your hard work! And all our plates were made available for sale in our Etsy shops: mine is still available here, along with a smaller sister plate with a different decoration. To find out more about each individual plate and shop links, here’s a link to the UCU blog post. UCU is also now on Pinterest too.


Sunday, 21 October 2012

New Studio Roof...and some pots

Pottery isn’t always about pots. Sometimes it’s about fixing a leaky roof. And that’s what I’ve been doing for the past few weeks. It’s been a disruptive month actually: the old leaky studio was so dilapidated the rain was pouring in like a tap. The whole roof had to be taken off and a new one put on - which of course meant clearing everything out of the studio and storing it elsewhere. And for added disruption the weather decided to be as wet and windy as possible! In the meantime I’ve managed somehow to continue making pots on corners of tables and in between the sounds of drilling. And although the roof is now watertight, there are still some details to finish and electrics that need putting in…

I’m really pleased though with my new roof! Studio space is so important to making – I find that if I feel comfortable in a space then it makes all the difference to the work. When the builders left I spent a few days painting the walls and fixing all the windows myself – so at the moment it feels like a brand new workroom. From now on the ‘new’ part of the studio will be a glazing/firing room while the other part of the studio will remain a making/throwing room. I hope by dividing the working space into two separate areas this will create a better flow of production. So I’m looking forward to a more efficient studio space once everything is finished.

In the meantime though I thought I’d show you some photos of the larger bird bowl design I was making in the last blog post. I’m quite pleased with the result. I only made two of these as test pieces really – the rest of the batch I made without ‘tails’ so they can be used as normal pouring/batter bowls.

And that’s October nearly over already! Next month it will be Christmas shows…

Saturday, 15 September 2012

Making Pouring Bowls

Turning or trimming base
In the past couple of days I’ve been making a small batch of batter bowls or larger pouring bowls. These are bowls with a pouring lip that prove really useful around the kitchen when cooking. I use one of my own pouring bowls regularly for beating eggs to make quick omelettes. They’re about the size of a normal breakfast bowl so they’re very handy to have around compared to traditional mixing bowls which are often huge cumbersome things stored at the back of cupboards. And of course having the lip just means they’re satisfying to use – which is the main thing of course.

Lifting Bowl off wheelhead after turning

These larger pouring bowls are really ‘a size up’ from my small drizzle bowls. So basically they follow the same shape and design but on a larger scale. Back in April I made a variation on my drizzle bowls by adding a small thumb handle. I called this variation ‘bird bowl’ pouring bowls because the handle seemed to look like a bird tail. They’ve proved quite popular and I’ve been asked to make a larger version of them. So in the same batch I’ve also made a couple of test bowls to see how feasible they are on a larger scale.

Making thumb handles

So far this larger bird bowl design seems to work. Sometimes scaling-up changes the nature of a pot so much that different sizes don’t always seem to relate to each other. Happily at the moment they have the same sort of vibe as the little ones do. I had to reconsider the design of the thumb handle so it could withstand the extra weight. An odd feature of making pottery is that logic, maths and ratios don’t always make sense: just doubling the size of the handle for instance wasn’t going to function well or look right. Instead I extended the width of the tail to accommodate the whole thumb and give support. Hopefully this will retain the function as well as keep the ‘feel’ of the little bowls. Of course I won’t know if they work as a design until they’ve been glazed.

Larger 'Bird Bowl Pouring Bowl'
Anyway, I’m quite pleased and excited by this larger size. When making pots I always think it’s a good sign if you feel the urge to keep one for yourself.

Detail handle and lip


Sunday, 2 September 2012

How to Make Pottery Stamps and Seals


The weather can make all the difference to making pots. Today has been damp and drizzly and the air feels colder too, which makes drying times much longer. The jugs I threw yesterday were too damp to turn and the handles I was making for them too soft to attach. So while I waited for both jugs and handles to dry out and stiffen, I decided to make some pottery stamps.

Pottery stamps are so easy to make. The easiest method is to take a piece of clay and roll it into a ball. Flatten one side of the ball to give yourself a ‘stamp’ area, and then use wooden sticks, metal tools or any type of utensil to carve or impress designs into the clay. This is best done while the clay is on its way to becoming leatherhard, but can be done to soft clay too if you make confident marks.


Alternatively, make a cylinder shape and impress your design right around the cylinder (but not the ends). This type of stamp is called a roulette. They work by holding them at the flat ends and rolling them like a wheel into soft clay to create a continuous repeat pattern. Both types of stamp must be left to dry out thoroughly before bisque firing in the kiln. This will make them hard enough to use again and again, and as long as you look after them (and don’t drop them!) they should last years.


This is exactly the method I used to make my own pottery seal. For the first few years of making pots I used to carve my initials into bases by hand. This is time consuming however and can sometimes look scratchy, so I decided to design my own seal. At first I got distracted by the idea of having a metal seal especially made: but this seemed an unnecessary expense and not personal enough. So instead I played around with some designs before settling on my initials made using a simple handmade clay seal. As you can see in the photo above, these have been bisque fired and feature my initials in reverse. They’re both the same design but one of them is indented and the other is in relief, which gives me the option of having an ‘outward’ or ‘inward’ stamp. I’ve been using them for about five years now and all my work is stamped using them: even the smallest buttons!


Anyway, eventually the jugs and handles dried out enough for me to finish them…

Thursday, 16 August 2012

Winter Landscape - Side Plates

Winter Landscape Side Plate
Back in July I was invited to take part in a promotional plate display idea as a part of UK Clay Users on Etsy. I don’t normally make plates. Large flat pieces tend to have a high mortality rate at various stages of making – they’re prone to cracking while drying or warping in the kiln, which makes them a costly item to make. However, since this was a ‘one-off’ idea, I thought I’d have a go at throwing a couple of small side plates and see how things go!

Winter Landscape Side Plate - Detail
Well yesterday I finally sent off my submission, which you can see in the photos above. This plate measures about 15cm across (or 6 inches). It’s made from stoneware clay and glazed using two different glazes: a white gloss and a blue/black glaze, which I’ve overlapped to create the idea of a landscape. The theme for the promotional idea was 'Winter' so I’ve called this one ‘Winter Landscape’. The other plate I made at the same time has been decorated using the same two glazes but with a slightly different approach. I’m planning to put this second plate into my Etsy shop available for sale in the near future.

Throwing Plates on a Bat


Freshly Thrown Plates on Bats
In the meantime though here are a couple of photos of both plates being thrown. As you can see they’re quite small – this helped to reduce the risk of cracking and warping. But it also means they’re very cute and perfect for just a couple of grapes or a snack as you can see in the last photo below!

Winter Landscape Side Plate with Grapes


Monday, 16 July 2012

Impression Vases

Impression vase - Birch Tree
I’ve been working on a new range of vases which I’ve called ‘Impression’ vases. The idea is quiet simple really – throw a vase shape and use objects to make impressions and marks in the clay while it’s still soft. These marks are then picked out and made a feature of in the design by using a combination of oxides and glazes brushed over the surface. So today I thought I’d show some photos of one particular vase during making.

Using a pebble to make marks


As you can see, I’ve the placed the vase upside-down on a wooden bat. The vase was thrown the day before this photo and the base lightly turned next day - so the clay is still quite wet. The wooden bat is resting on the wheelhead which I’m using as a banding wheel so I can see all around. And why is it upside-down? Well for some reason it’s easier to see what’s going on! I started making marks at the base of the pot and worked ‘down’ to the rim. This avoids the dangers of marks feeling ‘cramped’ at the base by running out of space and instead allows them to grow naturally ‘up’ the pot. And I’ve used a small beach pebble I’ve had for years. It’s always nice to use natural objects when making.


Oxide detail
I got the idea for this design back in November last year. I was doing a show at Quarr Abbey and in a coffee break I took some photos of the gardens and textures I found in the grounds (see post). The bark on a birch tree was particularly lovely and immediately suggested the idea to me. Of course the markings on birch bark are ‘raised’ rather than indented and the colours are much more subtle than I’ve used here: but I really like the results from this first vase and think I’d like to repeat the motif again on another piece. In the same making session I also decorated more vases using different impressions and marks, but using the same oxides and glazes. I’ve added two of these vases to my Etsy shop so far and will add more soon.

Anyway, I hope you enjoyed the photos!

Inside vase showing indents


Friday, 29 June 2012

Turning Pots Using Mirrors

New mirror opposite wheel for turning pots
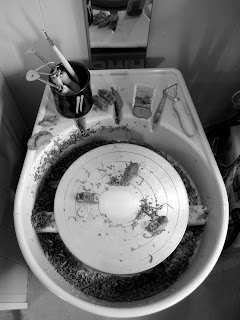
Over the past couple of weeks I’ve been trying out a new system in my studio to help me while throwing and turning pots on the wheel. I’ve had an old mirror lying around the house for years. It was taken off an unwanted wardrobe that the previous owners of our house had left behind: so you can imagine it was one of those long, tall, thin mirrors for seeing yourself full length. I had a feeling it would come in handy ‘one day’ so kept it, but hadn’t found a use for it - until now.

Recently I’ve been suffering from unexplained pain, headaches and numbness in my head and neck. A bit worrying as you can imagine, but after a couple of visits to the doctor and some serious re-assessment of my work practice, I came to the conclusion this was probably self-inflicted. I have a throwing habit that means I tend to strain my neck sideways by snapping quickly over to the right when I check the profile side of a pot. My doctor kept insisting I balance this action by checking the pot on the other side – but since there’s a wall on the left-hand side of my wheel (putting me in danger of cracking my head open) I’ve decided to ignore this suggestion entirely and instead opt for using a mirror to stop me from ‘side-checking’ altogether.


Turning pots using two mirrors
For years I used to use a small hand-mirror for throwing and turning but since I got my shimpo wheel last year I’ve dropped the habit for some reason. I know that potters are divided on the idea of using a mirror to help throw or turn. Some think using one doesn’t give a true representation of the shape of a pot and prefer the directness of seeing or touching the pot for real. I’ve always had the opinion that throwing a pot is hard enough as it is! So anything that can help or ‘ease the pain’ in the process of making a pot, is a potential tool like any other and therefore a positive thing. And after recent events I really can’t afford not to use one.

So I got the old glasscutters out and sliced my old mirror in two (it being far too tall just to lean against the wall). Luckily there was already a hole in the mirror where it used to attach to the wardrobe, and all I’ve done is screw this into the wall directly opposite my wheel. I also use my old hand mirror at a closer angle so I can get a ‘multi-mirror’ view of my pots: a bit like driving a car! Already I’ve noticed my symptoms are improving. I’m hoping that this new, safer work practice will have nipped the problem in the bud. And so far the pots are coming off the wheel quite nicely too!