Saturday, 18 November 2017

Christmas Stock: New Ceramic Bells and Star Tea-light holders.

New Star Cut Out Tea-light Holders

Christmas is officially back on track! In my last post I mentioned I was having kiln issues. Thankfully these were resolved after fitting a brand new isolation switch. The new one is more robust than the last one - which burnt itself out. Hopefully the new one should do a much better job and last longer too.

I was very lucky that nothing else seemed to be wrong with the kiln. I ran a small test firing to check the controller and thermocouple were behaving themselves by programming in a simple ramp of 30 minutes to about 30 degrees. All seemed well. So I spent a week glazing all my pots ready to fire two separate glaze firings.

Un-packing Glaze Fire 

After packing one of these kilns, all I could do was cross my fingers, turn on the switch and hope it all worked! Luckily it did. In fact I had two perfect glaze firings - one of which you can see in the composite above. Some of these pots have already gone out to galleries or for orders. But the rest are available in my Folksy and Etsy shops.

Ceramic Christmas Bells

So now I have a new batch of ceramic hand bells in stock. They come in two glaze options: plain white, and blue and white. And I also have a new version of my tea-light holders with a star shaped cut out. I think they work really well - and I wonder now why I didn't think of making them years ago!

Christmassy Star Tea-light Holders


Events News:

I'm going to be exhibiting at Quarr Abbey again this year for six days beginning next Thursday. So if you're on the island please do pop in. Here's a listing with all the details.

Thanks for reading!


Wednesday, 18 October 2017

Kiln Issues - A Problem with a Bisque Firing (Christmas on Hold!)

Christmas Bells Drying in the Kiln Room

I'm currently in limbo and don't know yet whether Christmas is cancelled or not! Last Sunday I packed the kiln full of pots for a bisque firing. Most of the pots are Christmas stock ready for the busy season and include a batch of Christmas Bells (see the photo above).

Everything was going well with the firing and seemed normal right up until about 550 - 600 degrees C (which was when I went to the kiln room to put the bungs in). I noticed an odd smell, but thought it was probably just an excess of steam and vapour coming out of the vent. Now the seasons have switched over, my pots are taking longer to dry. So I thought maybe some pots were a bit 'damp' when I packed the kiln, and this was causing the fumes.


Christmas Stock including Star Tea Light Holders waiting to be packed into the Kiln for Firing

It wasn't until I went to turn it off at the end of the firing a couple of hours later that I realised something had happened. Opening the kiln room door, I could see the kiln was glowing orange but the controller and electrics were dead. At this point my heart sank.

I checked the trip switch but that was fine. So something must have happened further down the line. It was evening and I'm always tired on firing day, so I felt pretty down. I was also frustrated with myself for not checking in on the kiln every hour to see progress. So I had no idea what temperature it got to before it went kaput. But the fact the kiln was glowing orange suggested that it might have got close to bisque temperature (which in my case is 1000 degrees C).

BEFORE: Four Shelves of Pots Packed for the Bisque Firing

Pottery is mostly a waiting game, so there was nothing I could do except leave it to cool. This would take at least a day and a half before I could risk cracking it open. In the meantime I must have gone through every possible scenario: explosions from damp pots, collapsed shelves, burnt out elements, frazzled electrics, mice chewing through the wires... I was preparing myself for losing all of my pots (that's a month's worth of work) and having to start again.

Finally Tuesday morning came and I opened the kiln. And this was the result (below). Unbelievably all the pots had bisque fired perfectly! Or at least it seems like they have. They all feel and look like I expect a bisque pot to be. I haven't tested any yet to see how they take on glaze, but I'm pretty sure they're fine. So I'm absolutely chuffed and relieved.

AFTER: Success! Bisque Fired Pots (against the odds)

I also discovered that my isolation switch for the kiln had cracked and a part of the plastic casing has melted. Probably this was the source of the smell. Everything else 'looks' fine (elements, thermocouple, wiring) so I have all my fingers crossed that it was just the switch. I have to wait again though (until next week) before I can get a new isolation switch fitted and have the kiln checked out. So the saga isn't over.

But I now have a new appreciation for my kiln! I suddenly think it's a legend for doing so well and getting all my pots safely through to bisque. I've decided as soon as I get the kiln running again I'm going to make something in thanks: the kiln gods need an offering...

Friday, 18 August 2017

Studio Update: New Shelves


For many years my studio has been populated with odd bits of second-hand furniture and shelves. Building up a studio from scratch often means adapting items you already have. I've always re-used and re-purposed old pieces of furniture that were 'down-graded' from the house and given them a new lease of life in the pottery. And when I needed something extra, I looked in second-hand shops for something to fill a gap.

The trouble with second-hand items though is while it might be cheaper than buying new, they don't always maximise the space. And my new studio - although bigger than the last one - somehow wasn't working out well using my existing kit; I was constantly tripping over stacks of stuff on the floor, whilst there was loads of unused space around the walls.


So I decided to get myself some new shelves. I needed tall, heavy-duty shelving that could withstand quite a lot of weight. I've never been keen on drilling holes into brickwork and didn't feel up to the challenge of designing a whole wall of twin-slot bracket shelving (way too daunting!) So I chose a brand new, self-standing, easy-to-assemble and adjustable metal shelf unit instead - delivered to my door.

It slotted (fairly) easily together and took me half a day with a mallet to bang all the pieces into place. It has five shelf boards (unfortunately chip) which I painted with a few coats of emulsion to seal them and make them more waterproof - a must in a pottery. I would have preferred real wood, but no where seemed to offer it.


As you can see in the photos, I've managed to get quite a lot of stuff onto these shelves with some room for more in the future (weight permitting). The tricky part was deciding where to place the height of each shelf as the 'adjustability' was only before assembly (once hammered in, there's no going back!) So I had to carefully plan where items would go so everything would fit in the best possible way. As a last minute brainwave I chose to fix the bottom shelf quite high off the ground allowing me to slide some heavy buckets underneath - and I'm so glad I did!

So far I'm very pleased with them, they seem fairly solid and I quite like the way they look too - which always helps!


Tuesday, 4 July 2017

Natural Dyeing Day - Wool, Cloth and Colours

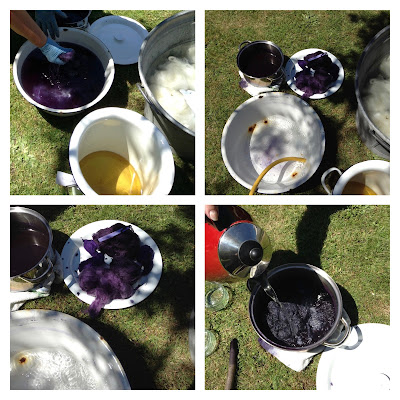
Clockwise from top left: Natural wool skeins and fleece, Brewing up some eucalyptus leaves, and below, Pots of dye bubbling on the open fire pit

I don't normally blog about anything else besides pots (and very occasionally paint). But last week my sister and I spent a lovely day in her garden enjoying ourselves doing some natural dyeing. It was so interesting to see all the colours appearing - and I took quite a few photos too, so I thought I'd blog about it for a change!

My sister (Sue Wright Handknits) is a weaver, spinner and knitter who uses natural dyes to colour her hand spun yarns. Last week she invited me to come along to help out - and have a go myself. So I went armed with overalls, a big bag of home grown nettles (for dyeing) and some small pieces of muslin to make test pieces.

Logwood Natural Dye: A gorgeous purple. The bottom right picture is after adding iron to get a blue purple.

Our first test was to bubble up my nettles in a pot. We stewed them for quite a while before straining the liquid off to use as our dye. Sue also stewed a batch of Eucalyptus leaves on the fire pit - which we thought would smell strongly of menthol, but didn't! These were our two home grown dye material sources, while the rest were natural dyes available from kits: like the gorgeous purple Logwood you can see in the photos above.

Brazilwood Natural Dye: vibrant salmon orange shades (on wool) and pale pinks on cloth.  The bottom right photo is with the addition of iron - again adding bluer tones

We got into a good routine with batches turning around regularly. Which meant there was barely enough time to admire the latest result before the next batch was ready to come off the fire, cool down and rinse.

The Logwood and the Brazilwood (above) we used twice to get two shades from each by adding iron to the second batch. As a potter this was a very interesting aspect to the dyeing process - how additions of iron can change the colour. What would we do without iron and its oxides?! In both cases there was a shift from the red tones in the colours to a bluer, cooler shade.

Natural Dye Results: gorgeous range of colours from 8 different batches

What was also really interesting is how different the results were between the wool and the cloth. While Sue's skeins and fleece came out a vivid salmon colour using the Brazilwood, my muslin cloth was a pretty pale pink. Unfortunately my nettles only gave a slight change of colour - a very pale cream. Next time we'll add the stalks too! But the Eucalyptus was a good yellow response compared to the Natural Dye Fustic kit which was a much paler yellow.

Natural Dye Results: (top to bottom) Nettle, Eucalyptus, Fustic, Brazilwood (pink), Logwood (blue), Brazilwood with iron (lilac), Logwood (purple) 

Overall it was a lovely day with lots of interesting and inspiring colours. Above is a photo of all my scraps of muslin together. As everything we used was natural, the colour ranges go together really well. I had planned to make a handmade voile for the backdoor with all my pieces - but instead I've been using them to help 'style' my pots in a recent photoshoot. So you might see them around!


Thank you Sue!!!

Friday, 7 April 2017

Setting Up the New Studio

New Shelves (and Brackets!) in the Kiln Shed

It's been a busy few months setting up the new studio. In fact so much has been happening I'm not sure where to begin blogging about it! I also didn't document the process - or progress - very well, so I don't have many photos. But here's the short version of everything that's been happening.

I began setting up the studio in January. The most important thing was getting a new space for the kiln. My poor kiln was stored in the garden shed for three months wrapped in bubblewrap and tarpaulin to keep him warm and dry. Luckily the winter wasn't harsh, so in January a new kiln room could be built ready for the electrics to be installed. The Electrician was booked for the 15th of Feb, which meant Valentine's Day (the day before!) was spent preparing the new space and moving the kiln into situ.

By the way, I don't recommend spending Valentine's Day with just two of you trying to move a 17 stone kiln out of one shed into another over soft mud using improvised duckboards on a steep gradient! Luckily there was only one injury - me. I crushed the palm of my hand between the kiln and the door frame, leaving a lovely big bruise for a week. But at least the kiln was installed safe and sound!

The Kiln in its New Home - Pouring Bowl Sets Stacked for Bisque

Anyway, the kiln room is now officially up and running with some shelves/ware boards (or at least brackets for future shelves!). I also treated my kiln batts to a good clean and a fresh coat of batt wash (pictured drying out below) which I usually do once a year at the start of the new year.

Panorama of One Half of the Main Studio - Kiln Batts Drying Out

In the meantime I also made some pots of course. After being featured in Landscape Magazine, most of the pots I decided to make were custom order pouring bowl sets - as well as a few staple pots like modern pourers. This was ideal really, not only because it meant the kiln was earning its keep, but (as the forms are so well known to me) it also made it easier to get back into the flow of throwing after a break over Christmas.


Freshly Thrown Bowls on Batts - These Became Berry Bowls

In fact, it was a good idea all round to stick to familiar pots I knew how to make and I'd recommend it for a first firing in a new studio. It meant I could quickly plan how to pack the bisque kiln (which pots go where) as I've done it so many times before. It also helped with glazing too. Apart from one big bowl which I glazed in Aqua, I chose to make pots using just my white glaze so I only had to prepare two tubs - there's nothing worse than returning to an old glaze that's been quietly solidifying into an impossible cake at the bottom for three months! Also, the last thing I wanted to do was 'creative glazing' when I didn't even know if the kiln would work. So instead, I tried to keep things as simple and practical as possible.

Pouring Bowl Sets Drying

As for the rest of the studio, things are still 'ad hoc'. It's a work in progress. Things are currently 'in a place', but not necessarily in the ideal place. It's actually quite disorientating working in a new space - even when making familiar pots. Nothing is quite where you thought to remember to put it - if you get my meaning! I'd sit myself down at the wheel thinking I was ready to start when I'd realise I'd forgotten to get something basic - like water. Oh well, I'm sure it will all slot in to place eventually. But at the moment there is still so much to plan and do...

RESULTS...

By the end of March I fired the kiln for its first bisque and also its first glaze! I'm delighted to report that everything went perfectly! The bisque was perfect, the glazing all went well and the glaze firing was perfect too. It was such a relief. It had been on my mind for about a year since deciding to move house - worrying if the kiln would be OK...

Here's a few photos of the pots that came out - my first pots in my new studio.


Since then I've bought some new bags of clay and I'm ready to make more pots and fire more kilns! (Fingers crossed!)

Friday, 3 February 2017

LandScape Magazine Feature: Pouring Bowls and Pancake Day


I'm absolutely thrilled to be featured in Jan/Feb 2017 issue of LandScape Magazine! You can find a photo of me holding my pouring bowl set on page 41 as part of an editorial for inspiring seasonal ideas and recipes for the kitchen.


Pancake Day isn't far away: it's the 28th of February this year, and my bowls are great for making small batches of batter as well as all sorts of other culinary uses! The small 'drizzle' bowl is perfect for drizzling oil (hence the name...) or for dipping sauces; and the larger pouring bowl comes in very handy for making scrambled eggs.


My pouring bowls are available as a set of two bowls (one small and one large) for £30.00. At the time of writing I've sold out of current stock, but they're available as a Made to Order custom listing in both my Etsy and Folksy shops (making time approx 10-12 weeks).

I really enjoyed this issue of LandScape Magazine which has articles on the British countryside, cooking and recipe ideas as well as features on crafts - especially traditional ones. So it's just my cup of tea! And it makes a really lovely start to the year to be featured - so thank you!