Thursday, 16 August 2012

Winter Landscape - Side Plates

Winter Landscape Side Plate
Back in July I was invited to take part in a promotional plate display idea as a part of UK Clay Users on Etsy. I don’t normally make plates. Large flat pieces tend to have a high mortality rate at various stages of making – they’re prone to cracking while drying or warping in the kiln, which makes them a costly item to make. However, since this was a ‘one-off’ idea, I thought I’d have a go at throwing a couple of small side plates and see how things go!

Winter Landscape Side Plate - Detail
Well yesterday I finally sent off my submission, which you can see in the photos above. This plate measures about 15cm across (or 6 inches). It’s made from stoneware clay and glazed using two different glazes: a white gloss and a blue/black glaze, which I’ve overlapped to create the idea of a landscape. The theme for the promotional idea was 'Winter' so I’ve called this one ‘Winter Landscape’. The other plate I made at the same time has been decorated using the same two glazes but with a slightly different approach. I’m planning to put this second plate into my Etsy shop available for sale in the near future.

Throwing Plates on a Bat


Freshly Thrown Plates on Bats
In the meantime though here are a couple of photos of both plates being thrown. As you can see they’re quite small – this helped to reduce the risk of cracking and warping. But it also means they’re very cute and perfect for just a couple of grapes or a snack as you can see in the last photo below!

Winter Landscape Side Plate with Grapes


Monday, 16 July 2012

Impression Vases

Impression vase - Birch Tree
I’ve been working on a new range of vases which I’ve called ‘Impression’ vases. The idea is quiet simple really – throw a vase shape and use objects to make impressions and marks in the clay while it’s still soft. These marks are then picked out and made a feature of in the design by using a combination of oxides and glazes brushed over the surface. So today I thought I’d show some photos of one particular vase during making.

Using a pebble to make marks


As you can see, I’ve the placed the vase upside-down on a wooden bat. The vase was thrown the day before this photo and the base lightly turned next day - so the clay is still quite wet. The wooden bat is resting on the wheelhead which I’m using as a banding wheel so I can see all around. And why is it upside-down? Well for some reason it’s easier to see what’s going on! I started making marks at the base of the pot and worked ‘down’ to the rim. This avoids the dangers of marks feeling ‘cramped’ at the base by running out of space and instead allows them to grow naturally ‘up’ the pot. And I’ve used a small beach pebble I’ve had for years. It’s always nice to use natural objects when making.


Oxide detail
I got the idea for this design back in November last year. I was doing a show at Quarr Abbey and in a coffee break I took some photos of the gardens and textures I found in the grounds (see post). The bark on a birch tree was particularly lovely and immediately suggested the idea to me. Of course the markings on birch bark are ‘raised’ rather than indented and the colours are much more subtle than I’ve used here: but I really like the results from this first vase and think I’d like to repeat the motif again on another piece. In the same making session I also decorated more vases using different impressions and marks, but using the same oxides and glazes. I’ve added two of these vases to my Etsy shop so far and will add more soon.

Anyway, I hope you enjoyed the photos!

Inside vase showing indents


Friday, 29 June 2012

Turning Pots Using Mirrors

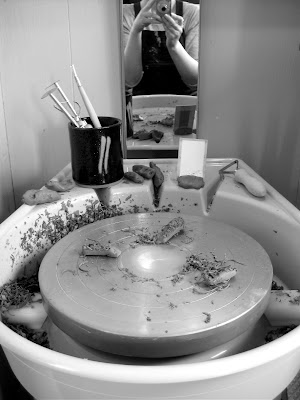
New mirror opposite wheel for turning pots
Over the past couple of weeks I’ve been trying out a new system in my studio to help me while throwing and turning pots on the wheel. I’ve had an old mirror lying around the house for years. It was taken off an unwanted wardrobe that the previous owners of our house had left behind: so you can imagine it was one of those long, tall, thin mirrors for seeing yourself full length. I had a feeling it would come in handy ‘one day’ so kept it, but hadn’t found a use for it - until now.

Recently I’ve been suffering from unexplained pain, headaches and numbness in my head and neck. A bit worrying as you can imagine, but after a couple of visits to the doctor and some serious re-assessment of my work practice, I came to the conclusion this was probably self-inflicted. I have a throwing habit that means I tend to strain my neck sideways by snapping quickly over to the right when I check the profile side of a pot. My doctor kept insisting I balance this action by checking the pot on the other side – but since there’s a wall on the left-hand side of my wheel (putting me in danger of cracking my head open) I’ve decided to ignore this suggestion entirely and instead opt for using a mirror to stop me from ‘side-checking’ altogether.
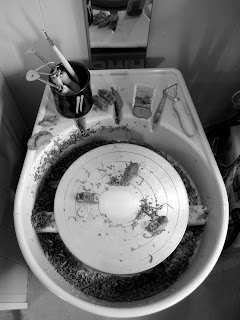

Turning pots using two mirrors
For years I used to use a small hand-mirror for throwing and turning but since I got my shimpo wheel last year I’ve dropped the habit for some reason. I know that potters are divided on the idea of using a mirror to help throw or turn. Some think using one doesn’t give a true representation of the shape of a pot and prefer the directness of seeing or touching the pot for real. I’ve always had the opinion that throwing a pot is hard enough as it is! So anything that can help or ‘ease the pain’ in the process of making a pot, is a potential tool like any other and therefore a positive thing. And after recent events I really can’t afford not to use one.

So I got the old glasscutters out and sliced my old mirror in two (it being far too tall just to lean against the wall). Luckily there was already a hole in the mirror where it used to attach to the wardrobe, and all I’ve done is screw this into the wall directly opposite my wheel. I also use my old hand mirror at a closer angle so I can get a ‘multi-mirror’ view of my pots: a bit like driving a car! Already I’ve noticed my symptoms are improving. I’m hoping that this new, safer work practice will have nipped the problem in the bud. And so far the pots are coming off the wheel quite nicely too!
Friday, 15 June 2012

New Etsy Shop Launched

Front Page of my Etsy Shop

Today I thought I’d officially launch my brand new Etsy shop. It’s been on the 'to do’ list for some time but I decided to open one now because I wanted a new on-line venue to showcase my latest work. So please do pop over to my shop and have a look.

I must say I’m enjoying using Etsy so far. The listing process is the easiest and fastest I’ve come across and I’m really pleased with the quality of my photos on this site and how clear my banner has reproduced. I’m still getting the hang of where everything is and I’m only just beginning to interact with people on the site. But I’m feeling very positive about my new shop and looking forward to seeing how I get along. 


My About Page (photos carousel)

Last week Etsy launched a new feature on their site called 'About’. This gives shop owners the opportunity to add photos and go into more background detail about their shops or focus on their working process for instance. This is an excellent feature which I think really enhances the feeling of it being ‘your’ shop with its own identity rather than 'just another’ shop on a huge massive site. And of course it’s loads of fun to play around with! I used my ‘About’ page to feature photos of the making process and also to talk about my aims or philosophy behind what I make and why – nothing too profound (!) but just something to highlight the ideas. I’m hoping it will give people a little bit of an insight without being too fluffy - and there’s a link to my blog at the side if they want to come here to see more.

Anyway, please do have a look at my 'About' page. Etsy are doing some maintenance tomorrow (Saturday) so if nothing's working, it’s not me! Any likes/contacts/circles/favourites greatly appreciated of course.

Also, I just wanted to thank Helen for featuring a white sugar jar she commissioned from me on her blog: click here to see her post. Thanks Helen.