Sunday, 19 July 2020

Latest Update: Instagram and Etsy Shop Links


It's been over a year since I updated this blog. I started writing about my pots back in 2009 and for a few years I posted here regularly. But things move on, so I thought it was time to officially archive and retire the blog. Instead you can follow my latest updates on my instagram: @judeallmanceramics.

You can also follow my latest work in my Etsy Shop which is now my main on-line shop. I've decided to temporarily retire my Folksy Shop partly because it's easier for me to keep track of stock - so don't be surprised if you find it empty! I may re-stock Folksy again near Christmas.

I hope people found this blog useful or interesting. I enjoyed writing it - when I had time! Thanks to everyone who followed, read my posts, commented and spread the word. The internet has changed so much in ten years. But maybe people are still coming here to read? I hope so! In the meantime, I will keep making pots...


Sunday, 18 November 2018

Pit Firing 2018


Back in September I tried out an alternative firing technique called pit firing. Although I enjoy using my electric kiln, it's fun to try something different now and again. I used to fire using a raku method but my last firing was seven years ago. Since then I moved house and now have a garden with enough space to try some firing experiments. Time to play with fire!

Pit firing (also known as smoke/sawdust/barrel firing) is a low temperature firing technique with origins in ancient methods of firing pots. Traditionally people stacked pots into a pile or pit in the ground, covered them in wood and other combustibles before setting alight. Instead of using glazes, chemicals found in the combustible materials react in the firing to create smoked surface markings. This gives some amazing results which I was keen to try.


Plans for my pit firing experiment started way back in the beginning of the year. I bought some white stoneware clay to use instead of my normal buff stoneware. Smoke markings show up better on a white background. I also decided to throw some rounded forms on the wheel because this allows the flames and smoke to flow over a larger surface area. Rounded shapes also survive better in low temperature firings. This naturally led me to make a batch of pots that were inspired by seed pods - which seemed fitting as I also had to collect lots of natural materials like grasses, seed heads, sawdust and seaweed to add as combustibles.


The pots were all burnished and then bisque fired (fired once) in my 'normal' electric kiln to give them a better chance of surviving the fire. The original plan was to do a pit firing in July but because the weather was extremely hot and dry for weeks (remember?!) it was too dangerous to risk lighting a fire in the garden - it was a tinderbox. So I waited until we'd had enough rain. Come September I'd managed to collect all sorts of additional materials including salt, copper (in various forms) and fruit peelings.

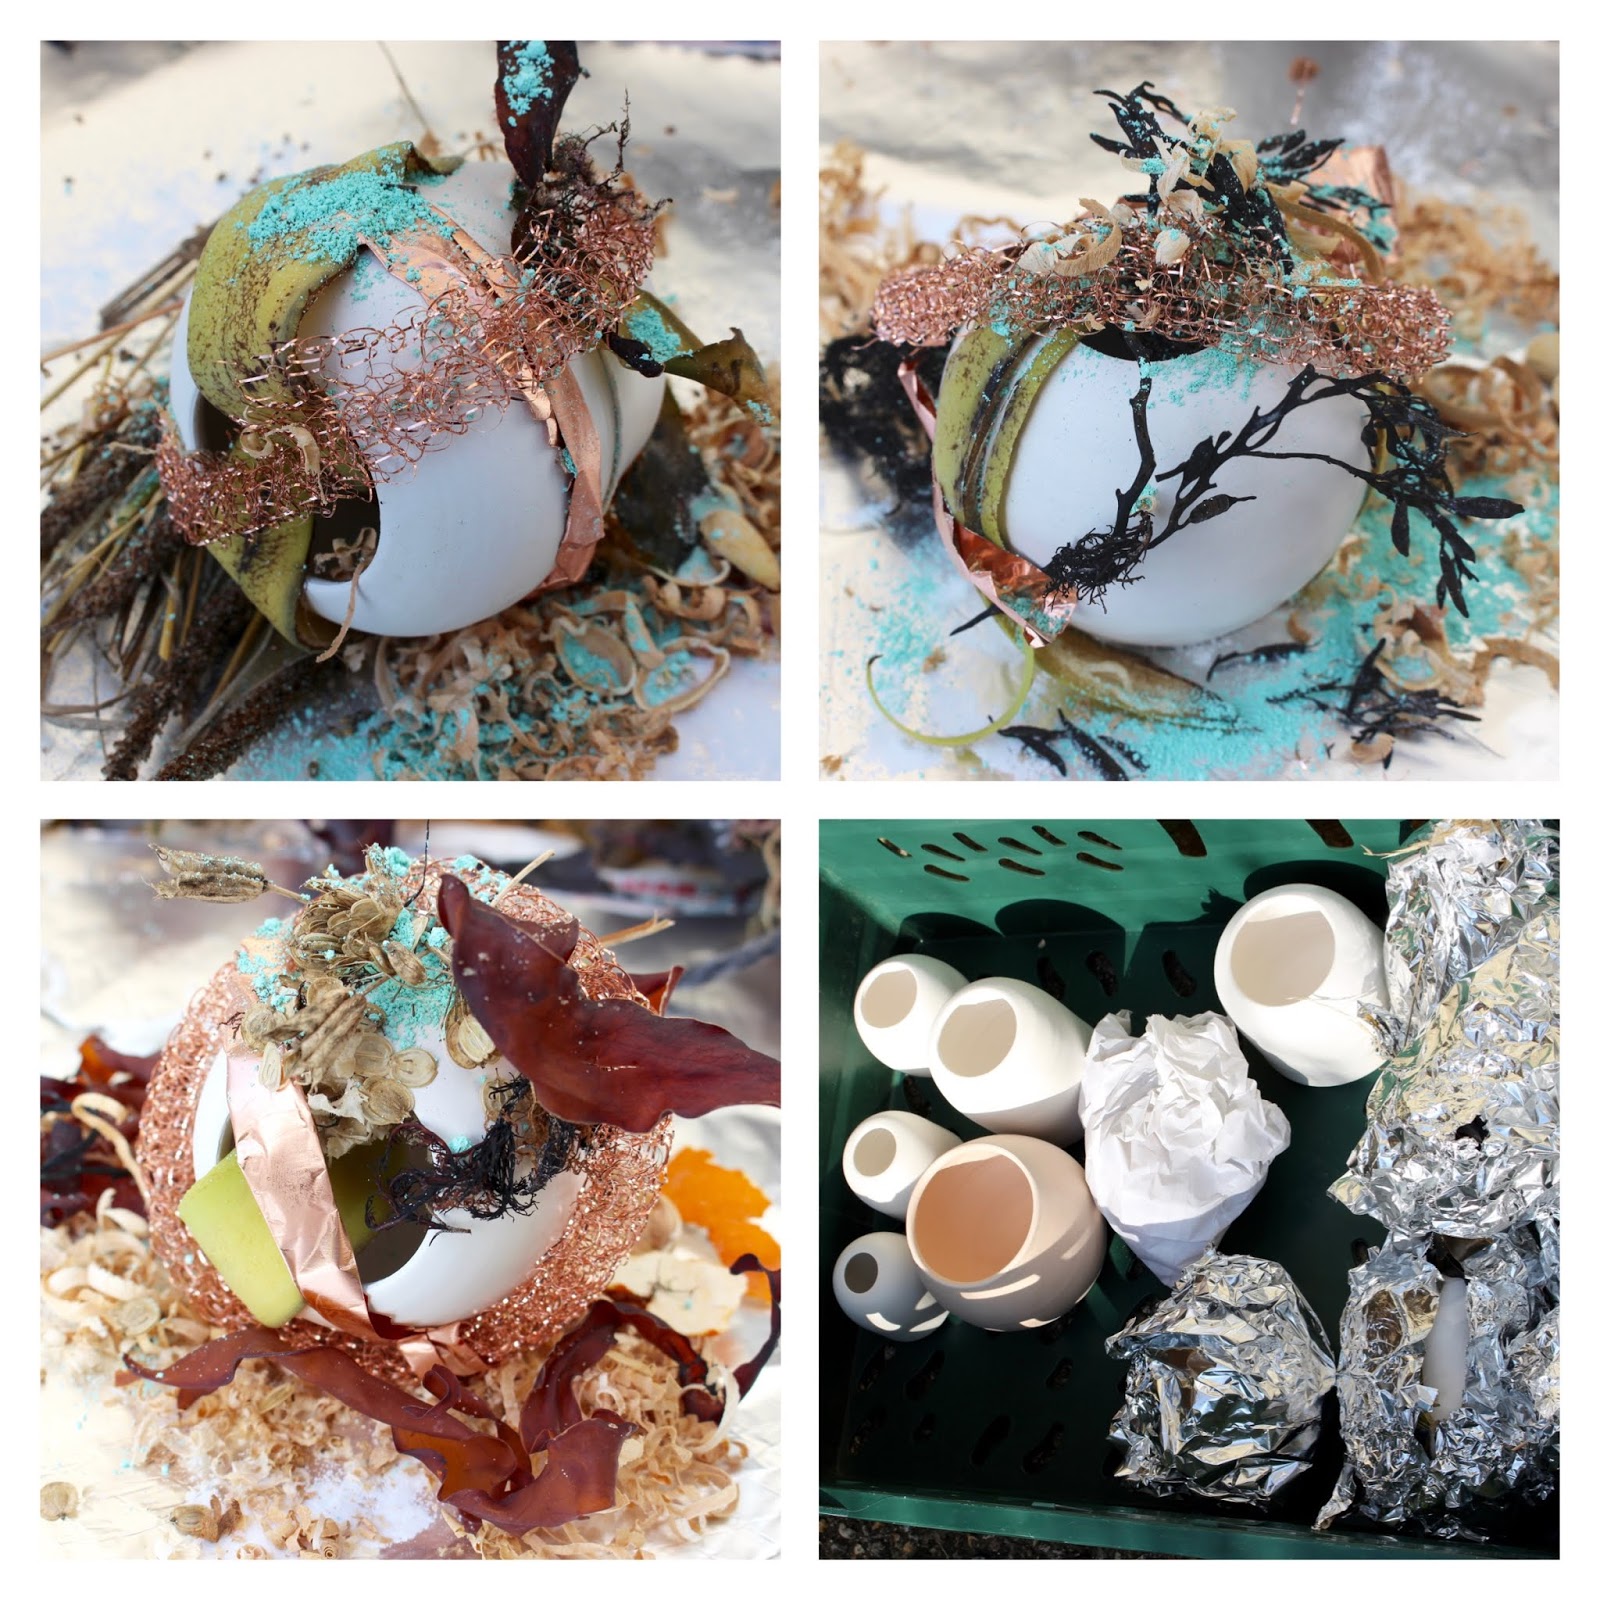
At last I had three days free to attempt a firing. The first day (very warm) was spent 'decorating' the pots. This involved packing a selection of the materials around the pot itself in the hope any chemical reactions will transfer directly onto the surface. Then I wrapped them individually in either aluminium or paper saggers. This took all day to do as I had quite a nice batch of pots and small pieces to decorate. And luckily I chose to do this outside and not in the studio because it proved to be messy. It's also nice to work outside for a change.


The next day I prepared my fire. Instead of a pit (not keen on digging a big hole!) I decided to use a barrel. It works on the same principle. So I sited my barrel and set to packing it. From then on my barrel became a 'kiln' in my head! Packing the kiln was all about reverse thinking - the fire is lit from the top not the bottom, so I have to plan the layers of sawdust, shredded paper, kindling and wood to cover the pots and to allow room for the fire.

After a shaky start (the fire smoked too much at the start and I couldn't get it to flame) at last I managed to get a good flame and fed it for about two hours. Then I closed the lid and stopped up all the gaps. I used a chimney cap on the top and wet clay as bungs. And then right on cue it started pouring with rain! But there was nothing I could do but leave it to smoke overnight.


I had no idea what to expect come morning. I was trying to stay philosophical as I walked up the garden to check on my 'kiln'. It could go either way. I lifted the lid. Warm ashes at the bottom. But also a patch of red. A red pot (you can see it in situ in the photo I took above). I picked it out and wiped off the ash to reveal a gorgeous little pod pot. And lots of others too, one after another. I was absolutely amazed and chuffed to bits at the results. And instantly, completely hooked!

The last phase in these complicated little pots was to polish them all with natural beeswax. In doing so the detail and patterns in the surface really show through. Every side of each pot has so many interesting markings that - depending on where you're looking - it can seem like a completely different pot. The marks themselves bring to mind all sorts of abstract visuals - many of the pots look to me like tiny planets or moons or a miniature cosmos. But I expect everybody will see something different in them.


All my new 'pod' pots are available in my Etsy and Folksy shops. I really enjoyed making these - they are so unique and fun to do. I'm already planning to make more next year!
Thursday, 27 September 2018

How to Make a Wood Ash Glaze (Revisited)

Wood Ash Glaze Tests

One of my most popular posts on this blog has been the one about how to make a wood ash glaze. It seems there's quite a few potters out there looking for information on this. So I thought I'd do an update in case anyone finds it useful or interesting!

I've completely run out of my first ash glaze - the one I made back in 2013. It was such a lovely glaze I used it on lots of pots. Since then I've moved house and now have a garden with mature trees which are always dropping branches. So I've got plenty of opportunities to gather wood ash from fires. I now have 2 bags of ash from the last 2 years of collecting.

Some of the trees in my garden

I don't separate the wood types when burning because it would take too long to gather enough ash. So the ash I've collected is a mixture of lots of different wood types including Ash, Chestnut, Apple, Oak, Damson and Hazel. We've also got a wood burning stove, so there's a mixture of 'shop bought' logs in there too.

Last time I posted about ash glazes I showed the glazing part. But this time I thought I'd do an update showing the ash sorting process. It's pretty simple really. Get your 'white' ash from a fire. It will have bits in it (leaves, twigs, charcoal etc). Then I use a normal kitchen-type sieve to separate the lumpy stuff from the white ash. 

Sorting Ash

At first I used a brush to help pass the ash through, but this was pushing bigger pieces past the mesh which I didn't want. So in the end I just tapped the sieve repeatedly on the side of the bucket and this was enough to shake it all through.


And that's it! No mystery. It does take a while to do though...at least a couple of hours just to sort through two buckets. These photos were actually taken back in July on a very hot day. Sorting ash is a messy business so I sat in the garden in the shade under the trees wearing a mask and goggles and tried to avoid breathing in dust!


The first bucket of ash had hardly any debris because it came from outdoor firings (lots of leaves, twigs and cardboard burned). But the second bucket had lots of charcoal pieces left over from the wood burner - as you can see in the photo below. I've also kept the charcoal separately because it still had plenty of fuel left in it and I intended to use that for something else - which I will post about another time! And you might notice I also broke my sieve doing this bucket!


As you can see from the photo below, the end result is quite a uniform fine grey/white ash. And this is what I use as a dry ingredient in a wood ash recipe. I don't bother washing the ash because it seems to work fine without. (This might be because it's a mixture of wood types rather than just one.) I then use a 60 mesh to sieve the glaze. I usually don't use a finer mesh than this because I feel it takes out some of the 'material' that makes the glaze unique.

Wood Ash: ready to use

I've also made a couple of glaze recipe tests. The top tile test is the same recipe as the one from my original post. But it's a bit dry and matte this time around. So I think I'm going to try it again with a percentage of iron oxide - this might loosen it up a bit and make it more glossy. That's my guess anyway!

Wood Ash Glaze Test Tiles

But the bottom tile I really like. It's a recipe from Emmanuel Cooper's The Potter's Book of Glaze Recipes 181 page 102. A lovely pale green with a fleck. So I'm going to make a batch of this and try it out on some pots. I'm looking forward to seeing how they turn out!

Anyway, I hope you enjoyed that - and it might have been interesting or useful to someone! Thanks for reading!

Saturday, 7 July 2018

In the Studio: New Chalkboard

Throwing Berry Bowls

Ah, the ubiquitous chalkboard! In my day we called them blackboards, but I suppose that reminds people too much of school. So chalkboard it is!

Ever since my old notice board (a pin and cork affair) fell off the wall onto a batch of freshly thrown jugs (yes, that really did happen) I've been thinking about an alternative system. The obvious choice is a trendy chalkboard - although I'm not sure being trendy is necessary in a studio. But being functional is, and applying chalkboard paint straight onto the wall at least guarantees that nothing can now fall on any freshly made pots.

Unless of course it's chalk. But as all potters know, chalk is essentially Whiting (a glaze ingredient) so I'm not too worried about the odd bit of chalk dust sprinkling around the studio.

Stages of Making Chalkboard

I actually enjoyed making this chalkboard. It's very easy to do - just a bit of masking tape to mark the area. I used a brush instead of a roller because it's quicker to just open the tin and go. I used two coats and you can see all the stages in the composite photo above. Peeling the masking tape off at the end was hugely satisfying too. 

Anyway, I recommend one of these if you have a studio that needs a space for writing short messages to yourself that are constantly changing. Below you can see I'm using it to start making up a glaze - the recipe is on the board above and can be wiped out as each ingredient goes in. Perfect for keeping track.

Glazing with New Chalkboard

Tuesday, 15 May 2018

This Week I Will Be Mostly...Glazing.


This week it's all about glazing. In fact I have plenty of glazing to do because I have enough bisque fired pots to fire two glaze kilns (which I plan to fire next week - all being well of course).

In the photo above you can see the kiln shed as it was a week or so ago -with pots waiting to be fired in the bisque kiln. And below are a few last minute shelf fillers - some tiny stoneware cottages, in a mixture of stoneware and black clays.


After I fire a kiln I always leave it to cool for a whole day in between. This makes sure all the pots are cooled down to 'room temperature' before I crack it open. Even so, they can still ping with the temperature change and make noises! I cracked this bisque kiln open last Friday: and below shows the kiln shed after I've opened and unpacked everything.


You can pack more pots into a bisque firing than into a glaze. In a bisque kiln the pots can touch each other and be stacked, but in a glaze they can't. So I already had some 'spare' bisque fired pots left over from the last firing. And this is why I've got two glaze kiln's worth of pots to glaze this week.


As you can see in the photo above and below there's a variety of small batches here. I've discovered that small batching in this way makes the best economical use of my kiln. Over time you get to know how many pots will fit onto each shelf and in what combinations. Even so, I still scribble a small 'floor plan' of each kiln shelf for each glaze kiln just to make sure everything will fit. There's nothing worse than having a couple of glazed pots left over which you can't fit in!


Anyway, I hope you enjoy these photos. My studio is currently a mess of glazing buckets, sponges and sieves! And there's still plenty of pots left to do...

Sunday, 25 March 2018

Photo Shoot at Home in the Kitchen


When it comes to taking photos of pots, my style of photography for the past ten years or so has favoured a plain white or minimalist background. I like the simple look of this style so it's always been a 'go to' choice for me. Also magazines prefer to use such images when publishing a feature.


But it does have drawbacks. The main one is that people can't tell at a glance how big or small a pot is. This is a concern when some of my pots might look exactly the same but come in different sizes - like my modern pourer jugs, bird tail bowls and pouring bowls. Also, some of my pots (like the garlic grater bowls for instance) don't translate very well on a plain white background. Some pots just need a bit more visual explanation!


So recently I decided I needed to do a photo shoot using 'styled' settings to give some of my pots a context. The setting I chose was my kitchen at home. Most of my pots are kitchenware or food related in some way, so it seemed an obvious choice.


Luckily there's enough daylight coming in through the kitchen window in the morning to allow me to take photos without the need for any additional lighting. I do have a reflector though (made from aluminium foil wrapped over a piece of cardboard) to help kick back some light into the shadows. I just prop it up where I need it.


And talking of props...sometimes this is the best part of planning a shoot. In this selection of photos I have some new props to play with. They include an old wooden board which I've painted using pale grey emulsion on one side. This board is movable so it can be used both as a surface or a backdrop for pots (as seen in the photo at the top of this post).


The unpainted wooden surface in the rest of these photos is actually my normal kitchen table and the little chopping board is one I use all the time for preparing food (it's handmade by CottageCoppicing). A jar of local honey, some garlic bulbs (also from the Isle of Wight) and other food props all help to set the scene. I'm hoping these photos will give some idea of scale and show the pots 'in action'.


Anyway, I hope you enjoy the new photos. As always, these pots are available to purchase from my Etsy and Folksy shops. Thanks for reading!

Tuesday, 30 January 2018

Spring Cleaning in the Studio

Snowdrops in the garden

January is nearly over and it looks like Spring is on its way already - as you can see from the lovely snowdrops in my garden.

I've been doing a bit of Spring Cleaning. I've got a few custom orders to make so it's nice to start the New Year fresh with a clean studio. I'm quite a tidy potter (I clean as I go!) because I find it difficult to work when things are messy. So the floor, shelves and wheel needed only a wipe over to get them back to feeling brand new.

Pottery Tools

I also like to clean and sort through all my throwing and turning tools once in a while. I keep them in an old vintage wooden cutlery tray which has a handle in the centre for moving them about in one go. This box normally sits right next to me on the wheel so the whole lot gets covered in splats of clay during throwing.

As you can see in the photos, they've all been given a good clean and are (obsessively?) arranged into separate sections - throwing tools, turning tools, wooden modelling tools, kidneys, knives... I know some potters might think this is unnecessary. But I find it helps enormously to always know where the right tool is kept and also that it's going to be clean and ready to use when you need it.

Throwing Tools and Turning Tools

Once the studio has had a Spring Clean, I find it useful at this time of year to do a complete stock take. This means checking through everything I need for the pottery business including things like glaze materials, stationery items and mailing supplies. And it's also a good time to get up-to-date with all my reclaim clay which can easily build up. So now all my slop buckets are empty and ready for throwing new pots.

As for finished pots, I'm pretty low on these at the moment. Most of the pots from my last glaze kiln (which I fired on Christmas Eve and opened on Boxing Day!) have already gone to local galleries and suppliers as New Year stock. So my on-line shops are currently very sparse. But I've made a long list of pots to make - most of which are my standard ware. As you can see in the photos below, I've already made a start throwing a small batch of jugs, but I'm keen to try some new pot ideas too - hopefully you'll get to see them soon!

Small Batch of Jugs

Saturday, 18 November 2017

Christmas Stock: New Ceramic Bells and Star Tea-light holders.

New Star Cut Out Tea-light Holders

Christmas is officially back on track! In my last post I mentioned I was having kiln issues. Thankfully these were resolved after fitting a brand new isolation switch. The new one is more robust than the last one - which burnt itself out. Hopefully the new one should do a much better job and last longer too.

I was very lucky that nothing else seemed to be wrong with the kiln. I ran a small test firing to check the controller and thermocouple were behaving themselves by programming in a simple ramp of 30 minutes to about 30 degrees. All seemed well. So I spent a week glazing all my pots ready to fire two separate glaze firings.

Un-packing Glaze Fire 

After packing one of these kilns, all I could do was cross my fingers, turn on the switch and hope it all worked! Luckily it did. In fact I had two perfect glaze firings - one of which you can see in the composite above. Some of these pots have already gone out to galleries or for orders. But the rest are available in my Folksy and Etsy shops.

Ceramic Christmas Bells

So now I have a new batch of ceramic hand bells in stock. They come in two glaze options: plain white, and blue and white. And I also have a new version of my tea-light holders with a star shaped cut out. I think they work really well - and I wonder now why I didn't think of making them years ago!

Christmassy Star Tea-light Holders


Events News:

I'm going to be exhibiting at Quarr Abbey again this year for six days beginning next Thursday. So if you're on the island please do pop in. Here's a listing with all the details.

Thanks for reading!


Wednesday, 18 October 2017

Kiln Issues - A Problem with a Bisque Firing (Christmas on Hold!)

Christmas Bells Drying in the Kiln Room

I'm currently in limbo and don't know yet whether Christmas is cancelled or not! Last Sunday I packed the kiln full of pots for a bisque firing. Most of the pots are Christmas stock ready for the busy season and include a batch of Christmas Bells (see the photo above).

Everything was going well with the firing and seemed normal right up until about 550 - 600 degrees C (which was when I went to the kiln room to put the bungs in). I noticed an odd smell, but thought it was probably just an excess of steam and vapour coming out of the vent. Now the seasons have switched over, my pots are taking longer to dry. So I thought maybe some pots were a bit 'damp' when I packed the kiln, and this was causing the fumes.


Christmas Stock including Star Tea Light Holders waiting to be packed into the Kiln for Firing

It wasn't until I went to turn it off at the end of the firing a couple of hours later that I realised something had happened. Opening the kiln room door, I could see the kiln was glowing orange but the controller and electrics were dead. At this point my heart sank.

I checked the trip switch but that was fine. So something must have happened further down the line. It was evening and I'm always tired on firing day, so I felt pretty down. I was also frustrated with myself for not checking in on the kiln every hour to see progress. So I had no idea what temperature it got to before it went kaput. But the fact the kiln was glowing orange suggested that it might have got close to bisque temperature (which in my case is 1000 degrees C).

BEFORE: Four Shelves of Pots Packed for the Bisque Firing

Pottery is mostly a waiting game, so there was nothing I could do except leave it to cool. This would take at least a day and a half before I could risk cracking it open. In the meantime I must have gone through every possible scenario: explosions from damp pots, collapsed shelves, burnt out elements, frazzled electrics, mice chewing through the wires... I was preparing myself for losing all of my pots (that's a month's worth of work) and having to start again.

Finally Tuesday morning came and I opened the kiln. And this was the result (below). Unbelievably all the pots had bisque fired perfectly! Or at least it seems like they have. They all feel and look like I expect a bisque pot to be. I haven't tested any yet to see how they take on glaze, but I'm pretty sure they're fine. So I'm absolutely chuffed and relieved.

AFTER: Success! Bisque Fired Pots (against the odds)

I also discovered that my isolation switch for the kiln had cracked and a part of the plastic casing has melted. Probably this was the source of the smell. Everything else 'looks' fine (elements, thermocouple, wiring) so I have all my fingers crossed that it was just the switch. I have to wait again though (until next week) before I can get a new isolation switch fitted and have the kiln checked out. So the saga isn't over.

But I now have a new appreciation for my kiln! I suddenly think it's a legend for doing so well and getting all my pots safely through to bisque. I've decided as soon as I get the kiln running again I'm going to make something in thanks: the kiln gods need an offering...

Friday, 18 August 2017

Studio Update: New Shelves


For many years my studio has been populated with odd bits of second-hand furniture and shelves. Building up a studio from scratch often means adapting items you already have. I've always re-used and re-purposed old pieces of furniture that were 'down-graded' from the house and given them a new lease of life in the pottery. And when I needed something extra, I looked in second-hand shops for something to fill a gap.

The trouble with second-hand items though is while it might be cheaper than buying new, they don't always maximise the space. And my new studio - although bigger than the last one - somehow wasn't working out well using my existing kit; I was constantly tripping over stacks of stuff on the floor, whilst there was loads of unused space around the walls.


So I decided to get myself some new shelves. I needed tall, heavy-duty shelving that could withstand quite a lot of weight. I've never been keen on drilling holes into brickwork and didn't feel up to the challenge of designing a whole wall of twin-slot bracket shelving (way too daunting!) So I chose a brand new, self-standing, easy-to-assemble and adjustable metal shelf unit instead - delivered to my door.

It slotted (fairly) easily together and took me half a day with a mallet to bang all the pieces into place. It has five shelf boards (unfortunately chip) which I painted with a few coats of emulsion to seal them and make them more waterproof - a must in a pottery. I would have preferred real wood, but no where seemed to offer it.


As you can see in the photos, I've managed to get quite a lot of stuff onto these shelves with some room for more in the future (weight permitting). The tricky part was deciding where to place the height of each shelf as the 'adjustability' was only before assembly (once hammered in, there's no going back!) So I had to carefully plan where items would go so everything would fit in the best possible way. As a last minute brainwave I chose to fix the bottom shelf quite high off the ground allowing me to slide some heavy buckets underneath - and I'm so glad I did!

So far I'm very pleased with them, they seem fairly solid and I quite like the way they look too - which always helps!


Tuesday, 4 July 2017

Natural Dyeing Day - Wool, Cloth and Colours

Clockwise from top left: Natural wool skeins and fleece, Brewing up some eucalyptus leaves, and below, Pots of dye bubbling on the open fire pit

I don't normally blog about anything else besides pots (and very occasionally paint). But last week my sister and I spent a lovely day in her garden enjoying ourselves doing some natural dyeing. It was so interesting to see all the colours appearing - and I took quite a few photos too, so I thought I'd blog about it for a change!

My sister (Sue Wright Handknits) is a weaver, spinner and knitter who uses natural dyes to colour her hand spun yarns. Last week she invited me to come along to help out - and have a go myself. So I went armed with overalls, a big bag of home grown nettles (for dyeing) and some small pieces of muslin to make test pieces.

Logwood Natural Dye: A gorgeous purple. The bottom right picture is after adding iron to get a blue purple.

Our first test was to bubble up my nettles in a pot. We stewed them for quite a while before straining the liquid off to use as our dye. Sue also stewed a batch of Eucalyptus leaves on the fire pit - which we thought would smell strongly of menthol, but didn't! These were our two home grown dye material sources, while the rest were natural dyes available from kits: like the gorgeous purple Logwood you can see in the photos above.

Brazilwood Natural Dye: vibrant salmon orange shades (on wool) and pale pinks on cloth.  The bottom right photo is with the addition of iron - again adding bluer tones

We got into a good routine with batches turning around regularly. Which meant there was barely enough time to admire the latest result before the next batch was ready to come off the fire, cool down and rinse.

The Logwood and the Brazilwood (above) we used twice to get two shades from each by adding iron to the second batch. As a potter this was a very interesting aspect to the dyeing process - how additions of iron can change the colour. What would we do without iron and its oxides?! In both cases there was a shift from the red tones in the colours to a bluer, cooler shade.

Natural Dye Results: gorgeous range of colours from 8 different batches

What was also really interesting is how different the results were between the wool and the cloth. While Sue's skeins and fleece came out a vivid salmon colour using the Brazilwood, my muslin cloth was a pretty pale pink. Unfortunately my nettles only gave a slight change of colour - a very pale cream. Next time we'll add the stalks too! But the Eucalyptus was a good yellow response compared to the Natural Dye Fustic kit which was a much paler yellow.

Natural Dye Results: (top to bottom) Nettle, Eucalyptus, Fustic, Brazilwood (pink), Logwood (blue), Brazilwood with iron (lilac), Logwood (purple) 

Overall it was a lovely day with lots of interesting and inspiring colours. Above is a photo of all my scraps of muslin together. As everything we used was natural, the colour ranges go together really well. I had planned to make a handmade voile for the backdoor with all my pieces - but instead I've been using them to help 'style' my pots in a recent photoshoot. So you might see them around!


Thank you Sue!!!