Saturday 23 April 2011

Raku 2011

I’m currently recovering from a very busy three-day raku firing session which happened this week. Once a year (occasionally twice) I take part in a raku firing workshop with a local group of potters and raku enthusiasts. This will be my fifth year of making raku and it’s still exciting to see the results. We started on Monday with a day of glazing, which was relatively sedate compared to Tuesday and Wednesday when we fired all day in relays. Overall we fired the kiln 13 times and processed over 300 individual pieces of work. Each morning we had the kiln packed and going by 10am and didn’t finish the day until about 5pm or 6pm in the evening. It’s an intense, smoky, hot, dangerous and backbreaking experience, which we’ve privately called ‘extreme raku’!

Anyway I thought you might like to see some photos of this year’s session. I forgot to take photos of some of the key stages this time round, so I’ve filled in the gaps in the process with some old shots I found from previous years.

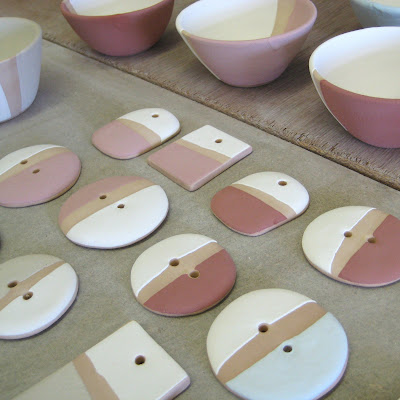
Above is a photo of a close-up of some of the small pieces I made for raku this year. These are still at the leatherhard stage drying out in readiness to be bisque-fired (pre-fired).
Above are some of my raku pieces now bisque-fired and being glazed. My glazing method here is mostly dipping straight into a glaze leaving areas ‘blank’ which will become black in the post-firing process.

A composite of the equipment: the burner at the back of the kiln, the propane bottle, the peephole at the front of the kiln (showing the temperature is nicely orange and ready for opening) and some drums full of sawdust smoking away.

This photo above is from August 2009. You can see the kiln in the top left corner with the door open. The pots are being unloaded using tongs while the glaze is still molten. They’re plunged straight into the sawdust inside the metal drums and smothered in more sawdust to stop them igniting. This is the post-firing process that creates the crackle effect and black carbonised colour of raku pieces.

This photo is also from August 2009. After leaving the pots in the sawdust for about 20 minutes, we dig them out using tongs. This was a lovely tall raku vase by a fellow potter – I remember it was a beautiful pot…!

Back to this year’s work. Above is a selection of my small raku bowls and pieces cooling down after being dug out of the sawdust. They’re covered in carbon and burnt sawdust residue at this stage.


Another composite of cleaning my new raku pieces using steel wool and water.

And that’s as far as I’ve got with the photos of this year’s raku. Hope you enjoyed looking at them. By the way, you can see photos from last year’s raku session here – it might explain the process more (if you’re interested!) I hope to start adding new raku pieces to my shop soon - when I've photographed them all - so please look out for them!

Sunday 17 April 2011

My RedBubble Account


About two weeks ago I finally got around to opening a RedBubble account. It’s been on the ‘to do’ list for quite some time. One reason for wanting to open one is trying to promote my paintings more (the pots have taken over in the past few years). But another reason is to do something with my ‘back catalogue’ of ‘old and sold’ paintings by making them available for purchase as greeting cards, prints and so on.

Long ago (before digital photography!) I used to take 35mm slides of all my paintings. I have a stack of them covering paintings from 1995 onwards. So I thought it would be a simple matter of getting them scanned and loaded onto my new RedBubble account. Well, to cut a long story short (a story that involves two separate scanners, a PC, a Mac, some cables and quite a lot of tea-and-angst) I discovered that while my slides look fab on my old lightbox, most of them really weren’t up to scratch for display on a computer screen - let alone for print. Not even Photoshop could revive them! So unfortunately I haven’t been able to add everything from my back catalogue. A bit disappointing but never mind.

In the past few days though I’ve loaded 24 images – and there’s plenty more to come. I’ll be adding more in the next few weeks and also when I paint something new too. I’ve already had some positive responses from people on the site, which has been really encouraging, although I’ve yet to explore RedBubble properly...there's too much to see!

Anyway, here’s a link to my main profile page on my RedBubble account. And here’s a link to my first journal entry there too – which is why I feel like I’ve written a blog entry already this week!

Sunday 10 April 2011

Special Delivery


I’m a bit over-excited at the moment. A huge lorry arrived outside the house on Friday morning and left behind this big parcel. I unwrapped it and look what was inside…


A lovely new Shimpo wheel! I’m so pleased with it. It’s a Shimpo Whisper RK3D and I’m so chuffed. Within minutes it was out of the box and set up in the corner of my studio. Then I decided to give my workspace a good clean and re-arrange everything to accommodate my new toy. So here’s a picture of my nice clean workroom…


Yesterday I tried out my new wheel for the first time. I decided to throw a few small bowls just to get used to things. And for the first time in absolutely years I had trouble centering. Two bowls had to go in the reclaim. Now at first I put this down to a) getting used to a new wheel, and b) being over-excited. But two bowls…? I'm used to using different wheels at the drop of a hat without losing a pot. So something wasn’t right. I found a forum on the Internet that suggested if you know it isn’t you who’s the problem then check the wheel head is level. I checked. I got my spirit level out and realized my studio floor is so bumpy the wheel head was sloping all over the place!


So I spent a good half an hour re-adjusting the re-adjustable foot on the wheel and putting pieces of cardboard under the others to get it right. The forum also had a little trick to test if the wheel is running true. Put a pencil with an absolutely flat base up-ended in the very centre of your wheel and spin, increasing the speed. If the wheel is level it will stay upright even at full speed. I tried this with a flat-based brush. At first it flew off the wheel even at slow speed. After lots of fiddling with cardboard it now stays upright. So hopefully I’ve fixed the problem!


Anyway, not all the bowls went in the reclaim; I managed to make three little bowls on my first throw despite the centering issue - and here’s one of them. I’ve added a lip as you can see, and I’ll be turning them soon when they’re dry enough. So I should find out in a day or two how I get on with turning on my new wheel! Still over-excited by the way…


Saturday 2 April 2011

Three Trees - Small Landscape Painting


I’ve been a bit pre-occupied lately with sorting out all my photographs. My computer was near bursting point with all of them. So I’ve been weeding through all my files and throwing out the out-of-focus stuff and endless duplicates that were clogging up the hard drive. It’s amazing how long these things take, especially if you’ve been avoiding it for months (possibly years…). At last though I’ve got everything backed-up and the older images that I’m not using at the moment are now safely archived in a drawer. My computer can breath more freely now.

Most of the images I take these days seem to fall into one of three main categories: pots, paintings and ‘research/resource materials’ for making either pots or paintings. And then in between there’s the occasional picture of someone smiling on a beach! With digital cameras it’s so easy to take 200 or 400 images in one go, which means sometimes I lose track of a batch of images and consequently the ‘plans’ I had for them. One such plan was to start adding my paintings to my Folksy shop. Such an obvious plan! And yet somehow it got waylaid…

Until today. At last I’ve finally listed an original painting in my shop. Above and below are some pictures of it (which, yes, I took today…don’t ask why!) and if you click on the pics they should take you to the listing. This painting is called ‘Three Trees’ and depicts a garden landscape. It’s a small acrylic on a ‘deep edge’ canvas and measures 6 x 6 x 1 ½ inches (15cm x 15cm x 4cm). I’m very fond of this painting – it’s quite restful and understated – and I think it’s a lovely little painting to start off with in my shop. And it seems to go quite well with the pots and cards already in there too!