Showing posts with label Raku. Show all posts

Saturday, 23 April 2011

Raku 2011

I’m currently recovering from a very busy three-day raku firing session which happened this week. Once a year (occasionally twice) I take part in a raku firing workshop with a local group of potters and raku enthusiasts. This will be my fifth year of making raku and it’s still exciting to see the results. We started on Monday with a day of glazing, which was relatively sedate compared to Tuesday and Wednesday when we fired all day in relays. Overall we fired the kiln 13 times and processed over 300 individual pieces of work. Each morning we had the kiln packed and going by 10am and didn’t finish the day until about 5pm or 6pm in the evening. It’s an intense, smoky, hot, dangerous and backbreaking experience, which we’ve privately called ‘extreme raku’!

Anyway I thought you might like to see some photos of this year’s session. I forgot to take photos of some of the key stages this time round, so I’ve filled in the gaps in the process with some old shots I found from previous years.

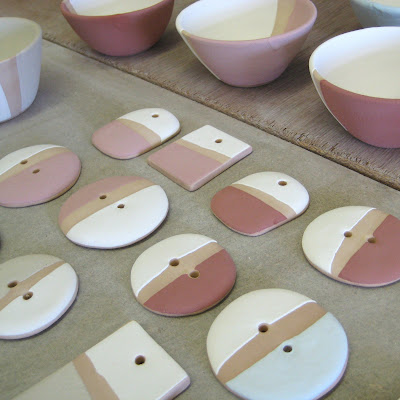
Above is a photo of a close-up of some of the small pieces I made for raku this year. These are still at the leatherhard stage drying out in readiness to be bisque-fired (pre-fired).
Above are some of my raku pieces now bisque-fired and being glazed. My glazing method here is mostly dipping straight into a glaze leaving areas ‘blank’ which will become black in the post-firing process.

A composite of the equipment: the burner at the back of the kiln, the propane bottle, the peephole at the front of the kiln (showing the temperature is nicely orange and ready for opening) and some drums full of sawdust smoking away.

This photo above is from August 2009. You can see the kiln in the top left corner with the door open. The pots are being unloaded using tongs while the glaze is still molten. They’re plunged straight into the sawdust inside the metal drums and smothered in more sawdust to stop them igniting. This is the post-firing process that creates the crackle effect and black carbonised colour of raku pieces.

This photo is also from August 2009. After leaving the pots in the sawdust for about 20 minutes, we dig them out using tongs. This was a lovely tall raku vase by a fellow potter – I remember it was a beautiful pot…!

Back to this year’s work. Above is a selection of my small raku bowls and pieces cooling down after being dug out of the sawdust. They’re covered in carbon and burnt sawdust residue at this stage.


Another composite of cleaning my new raku pieces using steel wool and water.

And that’s as far as I’ve got with the photos of this year’s raku. Hope you enjoyed looking at them. By the way, you can see photos from last year’s raku session here – it might explain the process more (if you’re interested!) I hope to start adding new raku pieces to my shop soon - when I've photographed them all - so please look out for them!

Wednesday, 15 September 2010

Buttons and Bags Revisited

A few weeks ago I took some photos of this lovely clutch bag made by fellow islander Gill from Gillian Chapman Felts in Freshwater on the Isle of Wight. This beautiful bag is one of a series Gill has designed using pure Jacobs fleece. The material has been hand-felted using a wet felting technique and the finished bag features one of my raku buttons in white and mushroom crackle glazes. I think the subtle tones of the wool and the subtle glazes on the button complement each other beautifully – and it’s always so nice to see my buttons being used in other people’s work. You can visit Gill’s Folksy shop here.

I have to say taking these photos proved a bit of a challenge for me! These days I’m fairly used to taking photos of my ceramics and have some inkling about what light will work for which glaze or what angle looks best for a certain shape. But until this shoot I didn’t realize how tricky it was to photograph textiles! The lighting needed for textiles to remain true to life in terms of colour is totally different from ceramics: or at least so it seemed on the day! So trying to get both the fabric and the button in proper focus and in true-colour-likeness proved for a long and tricky afternoon. In the end these three photos were the best shots of the day. But you can also see this bag and two others in this same style on Gill’s flickr page here (probably should have taken it to the beach to photograph too!)


Thursday, 19 August 2010

Garlic Festival Finds...

Last weekend my sister Sue and I shared a stall in the Arts and Crafts marquee at the Isle of Wight Garlic Festival. It went very well and although it was hard work we enjoyed ourselves. It was so busy by Sunday afternoon people were still queueing to get into the showground! So I’m pleased we made the decision to go again this year. Yet again my photos of the event were pretty rubbish and out of focus: too preoccupied with manning our stall. So instead I thought I’d blog about my new purchases…

At the festival I found a fabulous stall selling lots of gorgeous vintage tools and garden equipment. I picked up a lovely enamel bowl for my studio, and since I don’t have a sink in there it's perfect for all manner of uses. I’ve already been using it to do a bit of mid-summer cleaning: washing all my work aprons and tea towels which were long overdue. I also bought a pair of tongs from the same stall. These were a bit rusty and dirty to start with, but after a few minutes soaking in WD40 have cleaned up a treat. I haven’t used these yet but I’m sure when it comes to raku firing again they’ll be useful for finding tiny buttons or pendants in all the sawdust. But at just £2 for the bowl and a quid for the tongs I could hardly resist!


Finally I bought this lovely old metal bin with lid and handles for just £8. Not sure what it was originally – maybe it was an old steam cooker or a copper. But I saw it and instantly thought I could make it into a small raku kiln. So I’m really quite excited about it! I’ll have to do some research and draw up some plans on how it might work – but in theory all it needs is some ceramic fibre on the inside and a hole in the back for the burner. But even if it turns out not to be suitable, it’ll still be perfect as a reduction chamber in raku firing (ie; the bin full of sawdust into which the raku pots go when they come straight out of the kiln).

So all in all it was a successful weekend!

(My sister Sue was also tempted to buy some lovely bowls and pots from the same stall for her natural dyeing process. You can see her blog here.)

Tuesday, 6 July 2010

Buttons and Bags


Just wanted to mention this gorgeous bag pictured above. It’s made from pure Jacob and Mohair wool mix in a natural stone grey and hand crocheted in one piece by Deb Scudder of pipistrelle. And (you might recognise this) Deb has finished this beautiful bag with one of my little raku buttons in a mustard and white crackle glaze! I think they work beautifully together and I’m so pleased to see my little button doing what it was intended for! This truly is a unique piece: and you can read a more detailed explanation of the making process in the listing for this bag in her folksy shop and also her blog.

And here's a close-up of the button before it found its true purpose in life!

Thanks again Deb!

Tuesday, 4 May 2010

Raku Aftermath


(Raku buttons available here)

It’s been a few weeks since raku firing and I’ve been busy with the ‘aftermath’ – if that’s the right word. Debriefing? Raku is never a straightforward process and unlike ‘normal’ firing methods which means a pot is pretty much finished as soon as it’s out of the kiln, raku ware requires extra work at every stage, even the last.

First of all I had to give all the pots a really good clean. When the pots first emerge out of the sawdust they get an initial scrub to get the worst of the carbon off. But for some reason this is never quite enough and when you inspect them the following day, you realize there’s a lot more residue still to clean! So out come the brillos again…

I’m not sure what other raku makers do but I also find that raku pots can feel quite rough even after cleaning, particularly on unglazed areas like the base and - in my case - in the ‘black stripes’ I leave as a part of the design. So at this stage I always smooth all my raku pieces with fine sandpaper on all the blackened areas where the body of the pot is exposed. You have to be careful when doing this however that you don’t sand the pot too much! Because raku pots are low-fired they don’t fully vitrify like normal pots and so it’s much easier to actually shape them with sanding and accidentally expose the ‘un-smoked’ body of the pot underneath.

And then finally once I’ve done all this cleaning and smoothing I give them a quick polish with normal furniture polish and a yellow duster! It sounds somehow sacrilegious but I find it works wonders: it buffs the glaze and lustres, and enhances the exposed areas so they show up a deep matt black. I’ve heard people mention things like using beeswax on raku pots, especially on ‘resist’ or ‘naked’ raku items: but I tried this once and found it left a sticky, unpleasant coating which I didn’t like. Old-fashioned furniture polish (the type that comes in a flat tin to use on old wooden tables) however, works on exposed areas too - if you buff well enough afterwards.

So as you can imagine, considering I had about 50 raku pieces from this firing, this took me another couple of days! In the meantime I’ve also been photographing the results and making notes about the glazes. The photo at the top of this entry shows just some of the buttons from this firing: two of these have now been listed in my Folksy shop. Hopefully I’ll get around to putting some more raku in the shop soon.

Thursday, 22 April 2010

Raku Firing

I had an excellent three days last week making raku pots – and despite the gloves, mask and goggles, I did manage to take some photographs in the end! Here are some of them.

Above are some of my bisque ware in the process of being glazed. At this stage the glazes are all pastel shades and give very little clues as to how they will come out! Once the pots are glazed they sit on top of the kiln for a while to dry out (damp pots will tend to explode in the kiln).

Above is the raku kiln being packed with pots. Tongs are used here because we've already fired once in this photo (we had a relay going!) so the inside of the kiln is very hot (even though it looks cold).

The kiln is fired using propane from this gas cylinder you can see above: the tube goes from this fitting to the burner (which you can see in the photo below) which fires straight into the back of the kiln through the hole.


Above is a photo looking inside the kiln through the peep hole on the front door of the kiln. As you can see it's pretty hot in there! From a cold start it takes about an-hour-and-a-half to get to temperature, but in a 'raku relay' (firing one kiln after another) it takes about half-an-hour or forty minutes between kilns. The lovely orange colour in the photo shows the kiln is up to temperature, which is about 1000 degrees C. I meant to take a photo of the kiln door opening to show all the hot pots inside but I forgot: far too engrossed in getting the work out!

Above you can see one of my raku coasters being taken straight out of the hot kiln and put into drums of sawdust. The glaze here is still molten and looks different from the bisque state: but it also has to cool yet - so it still doesn't give any clues as to how it will look!

Sawdust is put into the barrels to smother each pot as soon as it comes out of the kiln. We had lots of photogenic flames during two days firing but this tiny little bit was all I caught on camera! Again, too busy trying to put the flames out! Anyway, the pots sit in the sawdust now for about half an hour to cool off and then the tongs are used to dig them out - like lucky dip!

Here are some of my pots fresh from the barrels. As you can see they're covered in carbon and burnt sawdust. They get a quick dunk in a bucket of water just to cool them down enough to touch - and then it's time to scrub them clean using steel wool.

And here above is a photo of the very same pots after about twenty minutes scrubbing!

And finally a photo of some champagne to celebrate the end of a successful and enjoyable three days raku!

Monday, 12 April 2010

Raku Preparations


Well it’s April, the weather is dry and warm and that can only mean one thing – it’s time for raku! I’ll be glazing on Thursday and then hopefully firing on Friday and Saturday. So far the weather reports suggest it will stay dry and won’t be too windy (wind is much worse than rain when you have fire and sawdust everywhere!) – so with any luck we’ll have perfect conditions.

In the meantime I have a busy week ahead making preparations. I’ve already sorted out my buttons, pendants and other little odds and ends which you can see in the photo above. They don’t look much at the moment – bisque ware is always the least inspiring stage in ceramics. These are made from stoneware with a little bit of grog added. I’ve given them a quick sandpaper just to smooth off any sharp edges, then I’ve wiped them back to make sure they’re free of dust. Then I’ve brushed a small amount of wax resist into the holes on the buttons and pendants to discourage the glaze from getting too clogged inside. This should help speed up the glazing process.

I also have a selection of small bowls, some coasters, some jars with lids, some incense holders and maybe a plaque or two to prepare. These also need a quick sanding and a wiping over with a damp sponge before I start glazing. In all I think I’ve got about 70 pieces of bisque for the kiln. Hopefully I’ll have a good survival rate and maybe a few successes too! Who knows? But it should be fun anyway.

If I get a chance to take photos for blogging I’ll try – but it’s hard to use a camera while wearing thick gloves, a pair of goggles and a face mask…!