
It’s difficult to know where to start. I’ve just come back from holiday, my first in literally years, and since it was also a significant birthday for me in March this year (I won’t say which one…) I really felt I deserved a break and a treat. So on a last minute booking I found a cottage to stay in for a week in the Cornish seaside town of St Ives…
Let me start by saying this has to be the perfect place to go when you’re into paintings and ceramics! The town ticked all my favourite boxes: seaside, beaches, Cornwall, galleries, pottery, coffee shops and narrow cobbled streets. There is simply too much to say about St Ives itself, so instead today I’m going to focus on just one of the places I visited during my stay: and that’s the Leach Pottery.

On the day I visited it was first-thing Monday morning and thick with fog. So as I walked up the enormous, heart-thumping hill towards the pottery – unable to see further than a few yards – I did wonder if I’d ever get there! I was really lucky to have the entire place to myself for two whole hours – and although this was excellent for me, it’s a sad state of affairs and a reflection perhaps of how little attention ceramics get compared to other art forms. However, politics aside (!) I really enjoyed my visit.
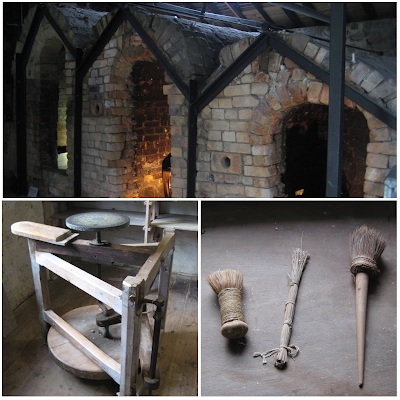
The new Leach Pottery complex is divided into three areas. The first is the museum, which allows visitors to walk around the original workshops. These have been kept pretty much as they were in Leach’s time and now have examples of original equipment on display. There’s also a lovely black and white film from the 50’s showing the pottery in action with first-hand narration by the American potter Warren Mackenzie (who studied under Leach). In the last part of the museum there’s examples of work by the main makers from the pottery, including Shoji Hamada, Janet Leach and Michael Cardew.

The next part of the complex contains the new dedicated studios where the modern apprentices work. This is where the new Leach Standard ware is made and workshops held. Although they’re not open to the public, you can peek into them via windows. The last part of the complex is the shop. Of course I spent about half an hour deciding what to buy! There was too much choice and I was limited by the fact I had to travel home on the train. In the end I bought a piece from the new Standard Ware range designed by Jack Doherty; a small soda-fired deep bowl in a beautiful black glaze. Chatting to the person in the shop, it was interesting to find out that although each apprentice had to make the Standard Ware to the same specifications, subtle differences meant they could tell who made what. So even at a glance she could tell me that Kat Wheeler (who apparently especially likes to make the bowl shapes from the new range!) made my new little bowl.

Overall it was a really inspiring visit and the whole place had a positive, informal atmosphere: something that often seems to go hand-in-hand with ceramics! I came out with lots of ideas and a nice warm feeling on a cold foggy day. I’m looking forward to getting back on the wheel soon (once all the post-holiday chaos has settled down) to try out some of those new ideas.


