Monday 21 March 2011

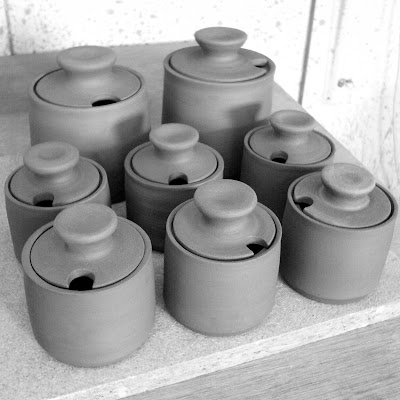
Mustard Pots Revisited: Turning

Opinion seems to be divided between those potters who enjoy turning and those who don’t. I fall into the former. In fact sometimes (I must confess) I enjoy turning more than throwing. I know: scandalous.

For those of you reading this who have no idea what I’m talking about, ‘turning’ is the process of finishing a wheel-thrown pot at a later stage – essentially when the pot has dried out a bit and become ‘leatherhard’. It usually involves putting the pot back on the wheel upside down and ‘turning’ away the excess clay from the base using a hand tool that shaves away the clay in ribbons to create a nice, clean finish. A bit like wood turning really.

Anyway, most of the time I enjoy turning. Sometimes though it’s pretty hard work! Turning these mustard pots took me about two hours of concentrated effort (with a little bit of angst thrown in). The base of the pots themselves was fairly straightforward and didn’t take too long: the hard part was turning the lids. Each lid had to fit its own individual pot at just the right size so it sits nicely onto the ledge inside the pot without touching the outer rim. This involves quite a lot of checking, measuring and checking again to make sure you don’t take too much clay away (otherwise the lid will fall in!) And then once that was done the most nerve-wracking part was cutting the holes for the spoons! Luckily though they all survived without any cracks or breakages – and I even made a couple of spare lids just in case.

The next stage for these little pots is the bisque kiln. I’m really pleased with how they’re shaping up though; I'm even thinking I might have to keep one of these for myself…

Monday 14 March 2011

Greetings Cards and Happy Birthday Tags

Today I listed these new greetings cards in my Folksy shop. They’re part of a series of small paintings I’ve designed that feature a little white bird: this one is called Little White Bird - Red Flower (previous post). This painting was made using acrylics on watercolour paper and finished using pastels to give it a soft feel. The white stem on the flower was made by actually scratching through the paint to reveal the white paper underneath.

Just as I was about to upload the image though I realized the photo background was looking decidedly yellow (it was sunny on the day of the shoot!) So I thought I’d have a go at making the background completely white around the object for this image (using Fireworks). I’ve never done this before so it was a bit fiddly to do: and I’m not entirely sure if it feels too white now! I certainly don’t have time to do this on all my photos – I take too many! And I suspect that a picture of a pot edited like this will make it seem like it’s hovering in space and a bit lifeless and flat – so I probably won’t be doing this too often. But it was an interesting exercise…


Anyway, the other thing I wanted to mention was these new Happy Birthday tags I listed in my Folksy shop yesterday. You might remember I talked about my letterpress in a previous post. Well finally I thought I’d show you the results of using my letters in a finished piece. These tags are perfect as little gift tokens or to add to gift-wrapping as a special feature. They measure about 35mm across and are strung on a pale blue ribbon with a drop of about 10cm. I thought they might be something a bit different for people to give – and I think they’re quite sweet really! (Click on pics to go to the listings.)

Thursday 3 March 2011

Making Mustard Pots

Back in January this year I mentioned some little wooden mustard spoons I found in a local ironmongers – something I’d been looking for for ages. Well at last I managed to make some mustard pots to go with them. Above are some photos of a batch of six mustard pots which I made yesterday together with eight matching lids (two spare in case of accidents).

In the same throwing session I also threw two larger ‘storage jars’ with three spare lids in the same style as the mustard pots. These may or may not become ‘honey pots’ (I have two wooden honey dippers in stock): I haven’t decided yet. But I’m quite pleased with the pots so far and looking forward to turning them to see if the lids will fit. These lids have been formed complete with knobs by throwing them flat on the wheel in one sitting. It’s a much quicker method of throwing lids and less wasteful of clay; but it means I’ve got limited turning available to correct any faults!


I also thought you might want to see how I make my designs. I keep notes on almost all the pots I make and include details like weights of clay and throwing measurements such as height and diameter. This means I can make a duplicate batch of pots to the same specifics or adapt the sizes to fit a new design. The new mustard pots are actually based on the same weights and general measurements of my tealight holders! I had to make sure the wooden spoons would fit the size of course but the only real difference in throwing terms is I’ve added a gallery for the lid to rest on.

Anyway, above is a picture of some notes and sketches I made for the mustard pots and below is a picture of me writing them out at the kitchen table…my trusty espresso cup by my side!