Friday, 22 October 2010

Sugar Bowls

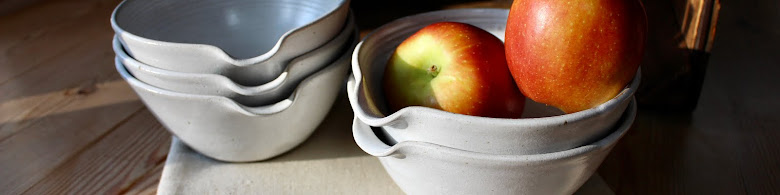
A while ago I blogged about adding food to my photos to help illustrate how my functional pots might be used in and around the home. During one of these shoots I used olives in my ‘small white bowls’ to give some colour and interest. I decided to try this again, this time using fruit and sugar. The above photo shows some of the new images I’ve taken which I’ve put together as a composite.

Using sugar in these photos gave me the idea of changing the description of my bowls from ‘small white bowls’ to ‘sugar bowls’. Originally I didn’t like the idea of being so specific in case people thought these bowls were limited to a particular use. But lately I’ve been wondering if it’s more useful (on-line at least) to be less vague: describing something as ‘small’ is a relative term and anyway I also make smaller bowls than these which I call ‘mini’ bowls! So I’ve started listing them as ‘sugar bowls’ in my Folksy shop hoping this means people will have more of an idea of the size of these bowls at a glance. Of course in the description details I also make the point they can be used for any number of things around the kitchen, like dips and olives etc. And at shows and in the real world - where they can be seen and touched - they almost don’t need explaining!

Here’s another photo of the same sized bowl in a different glaze. This is the wood ash glaze made from real wood ash. I’ve also called these ‘sugar bowls’ too in my listings just to be consistent. Here I’ve used limes and plums to illustrate size. These ‘sugar bowls’ measure 10cm by 4cm by the way – and are so useful! Click on the images above and below to link with the listings in my shop.

Sunday, 3 October 2010

Happy Birthday Blog!

I realised about twenty minutes ago that it’s been a whole year to the day that I began writing this blog! One whole year! I can’t believe it: the time has gone by so quickly. And although lots of pots have been made during the past year, regrettably only a few paintings have been painted... Hopefully though this new blogging year will redress the balance a bit.

Anyway, I felt I couldn’t really let the day go past without marking it in some way. So I’ve decided to wish my blog a Happy First Birthday by posting this photo. I took the photo ages ago of some letterpress typesetting letters I bought off eBay. They’re from a complete set of Gill Sans font size 14 and arrived in the post (with a very heavy thud on the front doormat) tightly packed in their own dinky little box. They looked so nice altogether I just had to take some photos.


I bought them for a multitude of reasons really. I don’t own a press unfortunately but the letters individually are useful for pressing into clay to make little messages in both words and numbers. And of course they come in handy for making hand-printed messages onto greetings cards or wrapping paper using ink and a steady hand. Anyway the photo seemed to suit the occasion – and I’d been meaning to blog about them for ages; just hadn’t got around to it!

Also, I thought this would be a good time to officially say thanks to everyone who follows my blog and for taking the time to read it! When I started it I never thought anyone would: so it’s been really nice to get all the lovely responses, tips and comments from people.

Anyway, that’s enough waffling: I have to load this now before midnight!

Friday, 24 September 2010

Pottery tools


I’ve decided to clean the studio this weekend. It’s been a busy summer and at the moment the studio feels like a dumping ground for boxes, bubblewrap and other show-related paraphernalia. I’m actually looking forward to sorting through everything and finding out what’s left in stock. I have two big Christmas shows planned for November (the first of which is only 7 weeks away) so I’m already trying to make a list of all the stock I need to make before then. Christmas decorations are high on that list…

In the meantime though I found this photo on my computer from the last time I managed to clean the studio – which was (shockingly) way back in March this year. It’s a shot I took of all my pottery tools freshly cleaned and laid out to dry. I remember thinking how nice they looked (I suppose I have a thing for tools!) so I decided to arrange them a bit and take a photo: I thought maybe other people would be interested to see what tools I use for making my pots. So here’s a quick run down of what they are and what I use them for.

Running roughly from top to bottom and generally from left to right:

  • Small hand mirror (for seeing the other side of the pot when throwing)
  • Big sponge (for big spills)
  • Bowl of slops in water (excess clay goes in here for reclaiming)
  • Three fine-pointed decorating brushes (for glazing)
  • A metal awl, wooden stick and a nail (for making holes in buttons etc)
  • Wooden triangular rib and metal kidney (for shaping pots while throwing)
  • Small piece of sandpaper (for smoothing bisque ware before glazing)
  • Long sponge on a stick (for soaking up water inside a tall pot when throwing)
  • Various round and small sponges (for every possible purpose imaginable)
  • A metal ribbon tool (for turning excess clay at the base of a pot)
  • Rubber slip trailer (for decorating with glaze or slip)
  • Wooden stick (for making holes in beads)
  • Three metal hole makers (for making various sized holes in pots)
  • Wooden pointy hand-building tool (for shaping hand-built pots or throwing)
  • Small sponge on a stick (for soaking water inside narrow pots when throwing)
  • Rubber kidney (for shaping pots while throwing)
  • Two-ended ribbon tool (for turning excess clay at the base of a pot)
  • Piece of chamois leather (used wet to smooth the rim of a pot when throwing)
  • Plastic stick (makes good holes in card to sew finished buttons onto)
  • Three bisque fired seals (to stamp my initials into wet clay)
  • Metal wire (for cutting pots off the wheel)
  • Metal pin (So many uses…)
  • Metal turning tool (for turning)
  • Metal ruler (to measure things!)
  • Two-ended blade tool (for cutting leatherhard clay)
  • Brush (for cleaning and attaching handles)
  • Calipers (for measuring pots)

Hope all of that makes sense! Anyway, unfortunately all of these tools are currently lying jumbled up in a box covered in dried clay. So tomorrow I hope to get them all looking as clean as they were back in March!

Wednesday, 15 September 2010

Buttons and Bags Revisited

A few weeks ago I took some photos of this lovely clutch bag made by fellow islander Gill from Gillian Chapman Felts in Freshwater on the Isle of Wight. This beautiful bag is one of a series Gill has designed using pure Jacobs fleece. The material has been hand-felted using a wet felting technique and the finished bag features one of my raku buttons in white and mushroom crackle glazes. I think the subtle tones of the wool and the subtle glazes on the button complement each other beautifully – and it’s always so nice to see my buttons being used in other people’s work. You can visit Gill’s Folksy shop here.

I have to say taking these photos proved a bit of a challenge for me! These days I’m fairly used to taking photos of my ceramics and have some inkling about what light will work for which glaze or what angle looks best for a certain shape. But until this shoot I didn’t realize how tricky it was to photograph textiles! The lighting needed for textiles to remain true to life in terms of colour is totally different from ceramics: or at least so it seemed on the day! So trying to get both the fabric and the button in proper focus and in true-colour-likeness proved for a long and tricky afternoon. In the end these three photos were the best shots of the day. But you can also see this bag and two others in this same style on Gill’s flickr page here (probably should have taken it to the beach to photograph too!)